Upcoming Changes to Data Sync and Ouvvi
In 2023 we will be releasing a new version of Data Synchronisation Studio and Ouvvi Automation Server, these will both be labelled as Version 6.0. Data Sync has jumped from V3 to V6 to keep the version numbers in-line with Ouvvi, as it there have been many releases over the years and it was time to start afresh.
There are a number of changes that have been made to improve the user experience of Ouvvi and the integration of Data Sync and Ouvvi, as well as updating the backend to use .NET Standard. The following page will cover the changes that have been made so far and how you use each feature, as you can download a functioning preview version now.

Considerations
Before getting started we recommend you take a backup of your Ouvvi Database and any local Data Sync projects. Once you have updated your Ouvvi database you will be unable to downgrade back to version 4 without using a backup to restore your site settings.
You can install and run Data Sync V6 alongside V3, so that you can choose between the versions depending on the project you are working with.
Any local Data Sync projects will open using Version 6 and once changes have been made and saved you may not be able to open all of your projects in Data Sync V3 (if you decide to downgrade). You will still be able to access Data Sync V3 from the start menu, but the default version will be V6.
Your license key can be used to activate both Data Sync V3 and V6 so long as they are both installed on the same machine, as they will both have the same Client ID.
Your local connection library will need copying to the new V6 location to be used in your projects, but this will be covered in a section below.
The following page assumes you have taken all the backups you need and you have downloaded and installed the latest version from the preview page.
Data Sync Changes
From the moment of downloading you will notice there are a couple of visual differences to Data Sync, the first being the new colours for the splash screen and Icon, and the second being the new icon. We decided to change the colour and icon to make it easier to tell the difference between the versions from a quick glance.
![]()
Alongside this minor visual change there have been a number of changes in the architecture of Data Sync.
The Data Sync core libraries have been updated to run on .NET Standard in preparation for the move to .NET Core in the future and the code base reduced and tidied to contain only what is needed. We've also updated the UI and Data Connectors framework to run .NET v4.8 which was released back in 2019 so should be compatible with most systems.
The code complier has been upgraded to be based on Roslyn. This is now running on C# Version 7.3, whereas previously the code compiler was running C# Version 4.0
This means you can now use the latest C# syntax in Calculated Columns, Dynamic Columns and Project Automation. For example you can use the null-coalescing operator?? and functions such as $"Hello{ID}" to replace values in a string with data from a specified column.
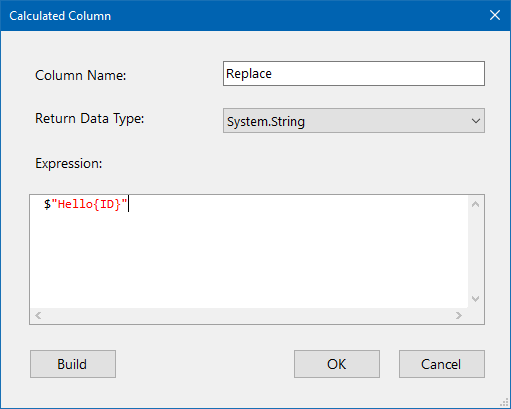
Currently the code editor is a few versions behind the compiler and so does not recognise the new C# syntax, but we are hoping to update this in the new year. For the time being you will get the squiggly line under any of this syntax but the code will still build.
At the moment the custom connectors on github and any connector that uses the Install custom connector function will not work as they need reworking to reference the correct code base. This will be handled before the final release but is currently not a functioning feature. If you have built your own custom connector for using in Data Sync you will need to rebuild it to get the latest code base.
An additional feature we have added is to make it possible to open your Ouvvi Data Sync steps within the Data Sync designer. This is covered in more detail in the section below.
Copy the Local Connection Library
When you first open Data Sync V6 you will find your connection library isn't automatically imported. You will need to copy your current connections over or re-create them in the designer.
To copy your current local connections open the registry folder for Data Sync V3, by default this is usually C:\ProgramData\Simego\DataSyncStudio30\Registry .
Then copy the connection files and paste them into the registry folder for Data Sync V6, by default this is C:\ProgramData\Simego\DataSyncStudio60\Registry.
Your connections will then be available to use from the connection library window in Data Sync.
For Ouvvi, if you have upgraded your version using the deployment manager, your connections should still be in the database. However there may be some connection types that no longer function and will need updating.
Opening Ouvvi Steps in Data Sync
You will be able to connect and open your Data Sync projects stored within your Ouvvi site from Data Sync. We're hoping that this will make it easier and more obvious on how to edit your projects when they are stored within your Ouvvi Database. To access the projects from Data Sync go to the File menu and select Open Ouvvi Project.
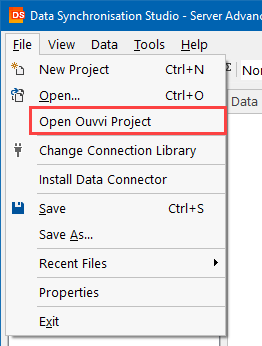
This will open the Ouvvi Connection Window where you need to enter in the URL to your Ouvvi site (by default this is usually http://localhost:8080) and click Connect.
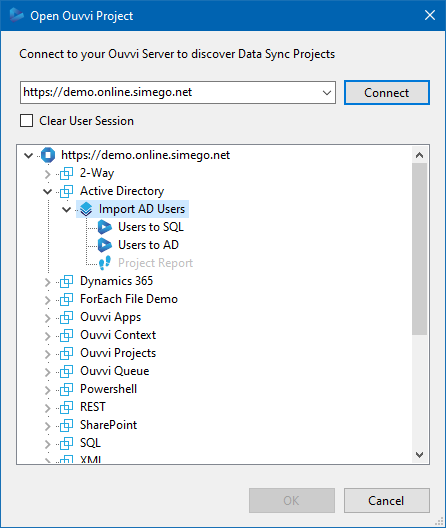
You will then be able to see your groups, projects and steps.
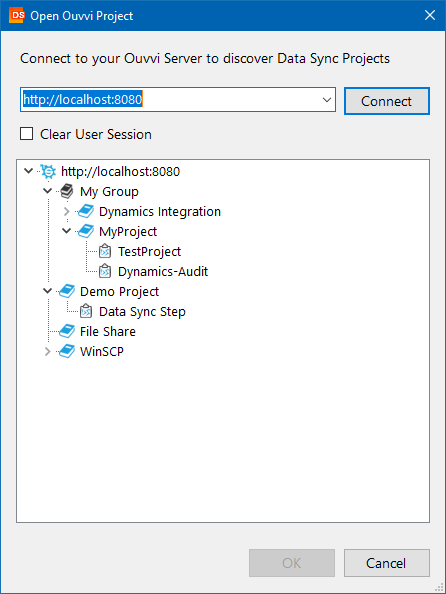
From this connection window you will be able to open your Data Sync steps, create new projects within your Ouvvi site and provision/create Data Sync steps within your projects. We will cover how to do this in a moment.
To open your Data Sync step simply double click and it will be opened in the Data Sync window. This will download a local copy to your download folder but whilst it shows as connected to Ouvvi (see toolbar, connection library, output window and status bar), you will be using the Ouvvi connection library and saving any changes back to your Ouvvi site.
You can connect to different Ouvvi sites by entering each URL, and can switch between them by selecting the URLs from the dropdown.
Create an Ouvvi Project
Within the Connection Window to Ouvvi in Data Sync you can design your Projects by creating new Projects and Data Sync Steps. This can either be to quickly mock up your project or to fully build and devleop it.
To create a new project in Ouvvi right click onto the site URL in the tree view to add a project outside of a group, or right click onto the group you want to add the project to and select Add Project.
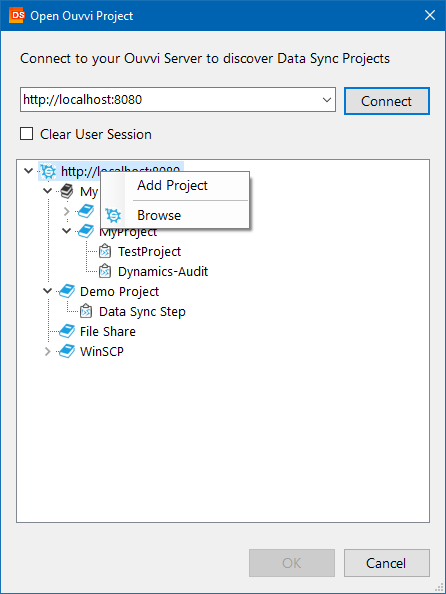
This will open a window where you can define the project name, then click OK to create it.
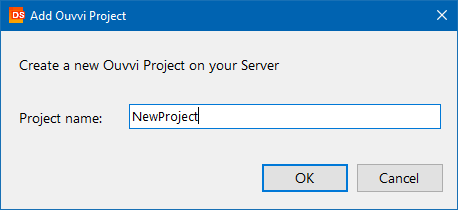
This will then add the project to the tree and you can add Data Sync Steps as needed.
Create a New Data Sync Step
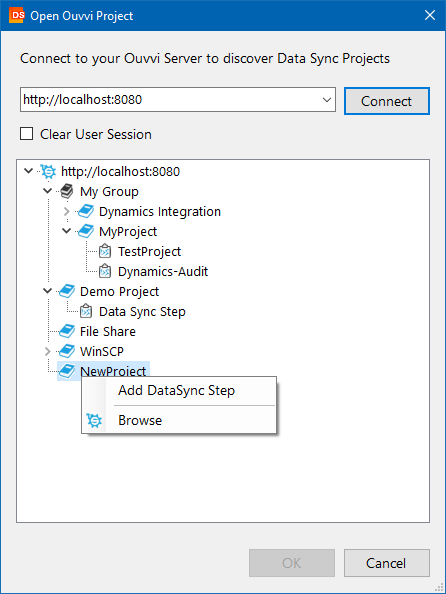
To create a new Data Sync Step, right click onto the project you want to add it to and select Add DataSync Step.
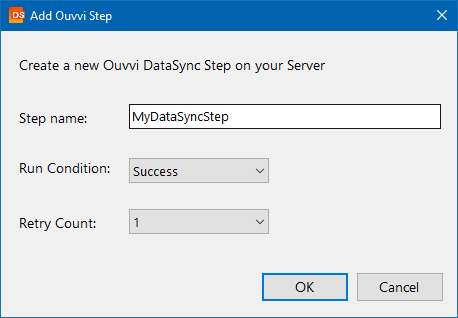
This will open a new window where you can enter in the name for hte step, the retry count and the run condition.
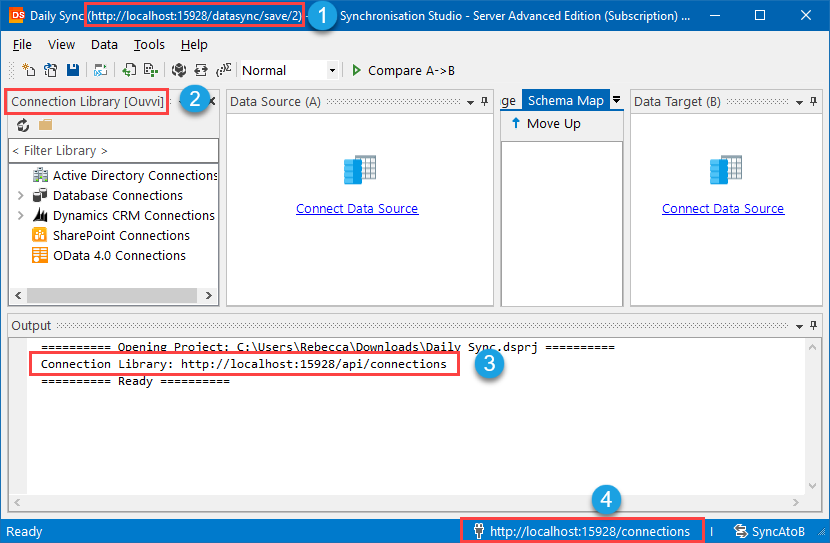
The step will then be added to the tree and you can double click it to open it in Data Sync. The project will be connected to Ouvvi and any changes you make and save will be uploaded into Ouvvi automatically. You can tell when the project is connected to Ouvvi in 4 locations:
- The Title Bar : This will show the URL to your Ouvvi project
- The Connection Library : This will show [Ouvvi] in the title bar of the window
- The Output Window : This will show the URL to your Ouvvi project in the output for the connection library
- The Footer Bar : To the right of the footer you will find the URL to the Ouvvi registry (connection library)
If none of the above are showing then you are not connected to Ouvvi and you will need to follow the steps again to re-open the project.
Ouvvi UI Changes
When you now browse to your Ouvvi site you will notice that the UI has been changed. This follows a similar style to Ouvvi V2.5 however uses a few different styles and has better navigational options. We also have dark themes available under system settings.
Our key reasoning behind the UI change was to improve your experience when using Ouvvi. We found it seemed difficult to find functions on the page, and explanations of how to do something became cumbersome. We also noticed that you can quickly loose your position when performing tasks and if you wanted to carry on editing a project you would need to re-navigate back to it.
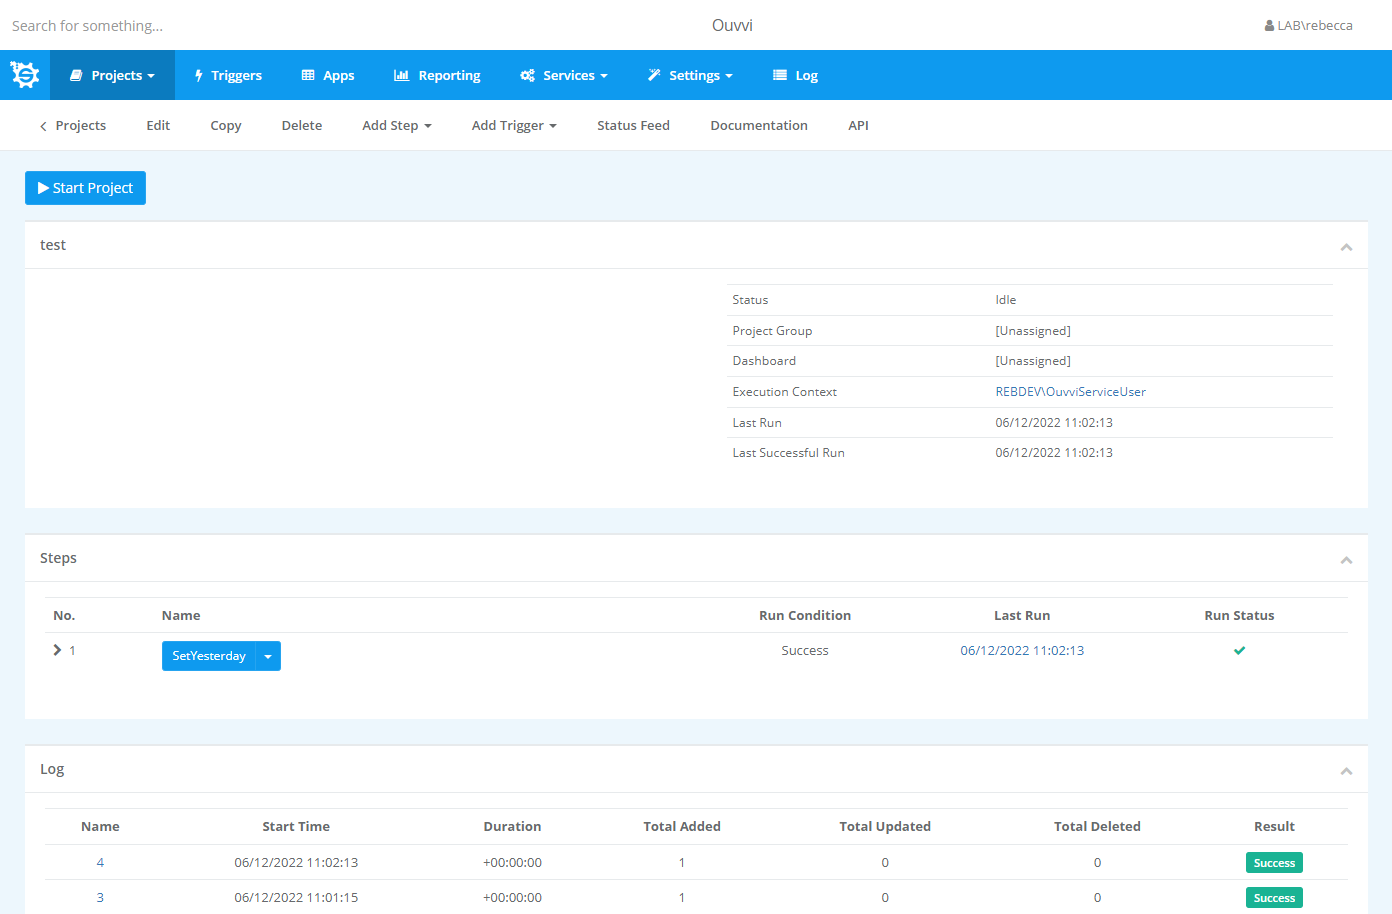
You will now notice all of the navigation appears at the top of the page, there is a main toolbar and a small navigation menu that will appear when necessary. Within the small toolbar you will find the functions relating to the page you are currently on. Taking the project overview page shown below, you can find the navigation back to the view all projects page along with the add step and trigger functions within the small sub-toolbar..
For the steps within the project you can now choose to open or edit them from the dropdown, this reduces the number of pages you need to navigate and then number of clicks to perform the actions. If the step is a Data Sync step you will also have the option to open the project in Data Sync to allow you to edit the proejct as you need.
On some pages you will find quick function buttons, and some functions will now be performed in overlay windows instead of on a new page.
In the sections below we will cover a few of these and where you might find them.
Overlay Windows
To further help with navigation, we felt that there were too many page changes when you wanted to do something simple such as edit a user setting, copy a step and deleting a step etc.
To achieve this we have now made simple actions an overlay popup window so that you can quickly perform these tasks and do not loose where you were in Ouvvi.
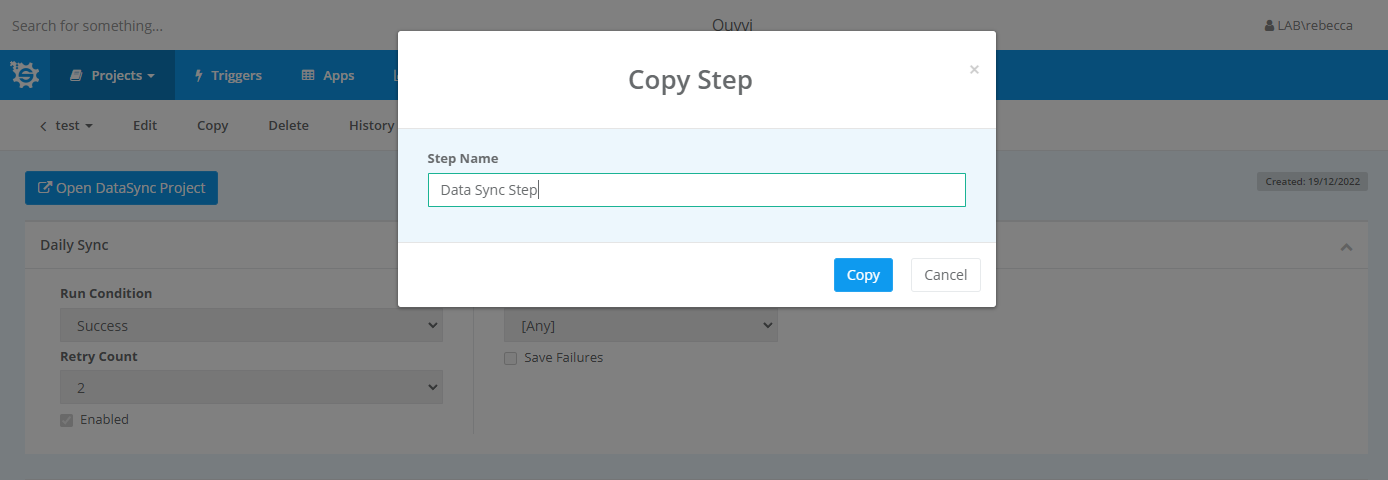
You will find these interspersed throughout the UI and can either perform the task, click the cross or click away from the overlay to close the window.
Button Functionality
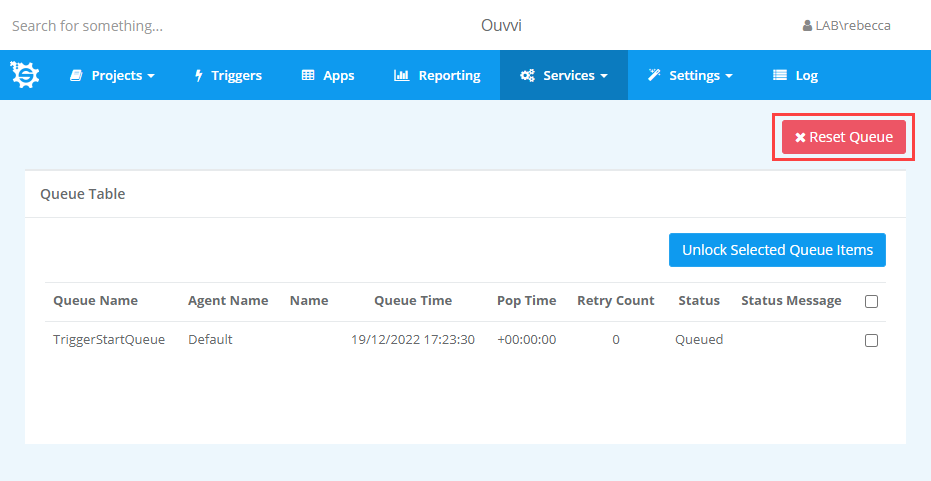
Another feature that has been added is a series of quick function buttons. These range from ending a process, reseting the queue, adding a service agent and so on.
The idea behind this is to remove the need for you to access the database directly and be able to perform everything you need to from the browser. This will allow users to resolve these issues, as the database is not always accessible for all users.
For example, in the past if the Server got unexpectedly restarted and the queue got stuck, you would need to access the Ouvvi database to drop the items in the queue table to get your projects back up and running. Now you simply navigate to the queue table and click Reset Queue.
Note that you need to have stopped your services before clicking reset to prevent other issues.
Another button like this is the Reset Trigger Clock which can be found on the Triggers page.
If you can think of any other quick functions you would find useful in your Ouvvi site, get in touch with us and we can see if we can add them to the build.
Configuring Ouvvi
Understanding authentication options and service user accounts can be confusing, but in this update we have tried to make the Ouvvi setup and configuration as straight forward as we currently can, trying to lead users through the steps with a next, next, next pattern.
The deployment manager has also been changed so that it disables editing the configuration unless it has been uninstalled, as none of the changes will be applied until it is uninstalled and reinstalled. This is all to make it clearer to users when items can and cannot be changed.
Ouvvi Authentication Options
In Ouvvi V6 we have made it possible to choose your preferred authentication type. You can choose between Windows and Forms authentication during the initial configuration and then you can further choose to use Azure AD credentials.
Windows Authentication uses local machine users, whereas Forms Authentication allows you to define your own usernames and passwords or use Azure AD Credentials.
You can specify the authentication type in the deployment manager configuration window by changing the drop down option.
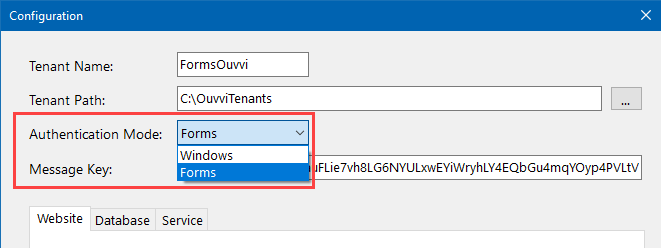
If you selected Windows Authentication it will continue to use Windows Accounts via Integrated Security managed by IIS as before.
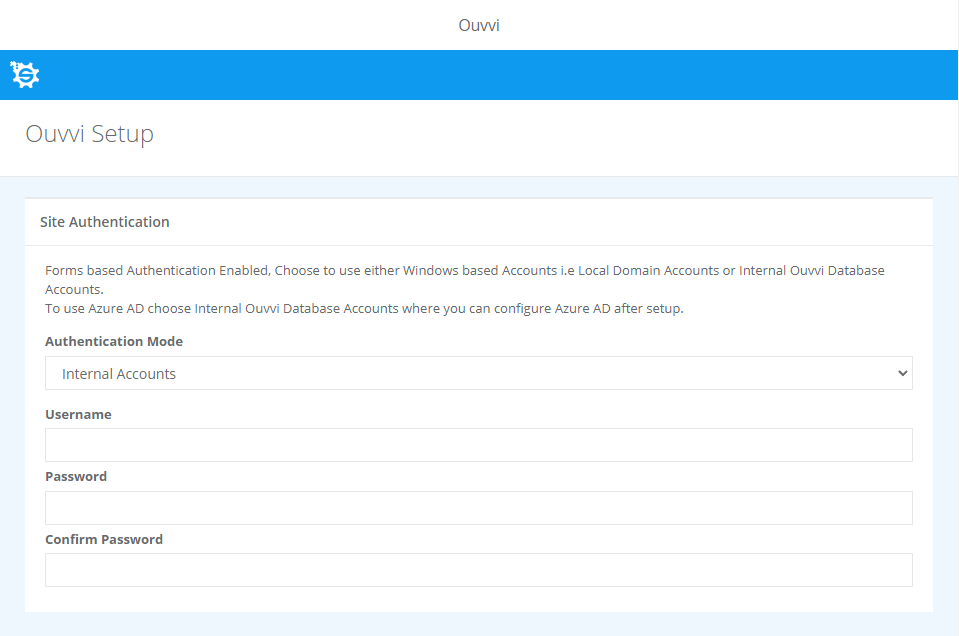
If you selected Forms Authentication then you can choose between using Windows Accounts (Local Domain Accounts) or Internal Ouvvi Accounts to sign into Ouvvi on the setup page. If you select Internal accounts you can later configure Ouvvi to use Azure AD Credentials to sign in.
Azure AD Accounts
To make Ouvvi use your Azure AD credentials for users you need to first browse to Ouvvi and make sure the Authentication Mode drop-down is set to Internal Accounts. Then enter in a set of credentials you want to act as the default account. This will be used to sign in to Ouvvi until you have configured the Azure AD connection.
Now go to Settings > System Settings and click onto the Azure AD button in the sub toolbar menu.

You then need to setup an Azure AD app to enable the connection, making sure to use the redirect URL listed on the Ouvvi Azure AD Setup page. From the app you need to enter the Tenant (Directory) ID and Client (Application) ID, then click Continue.
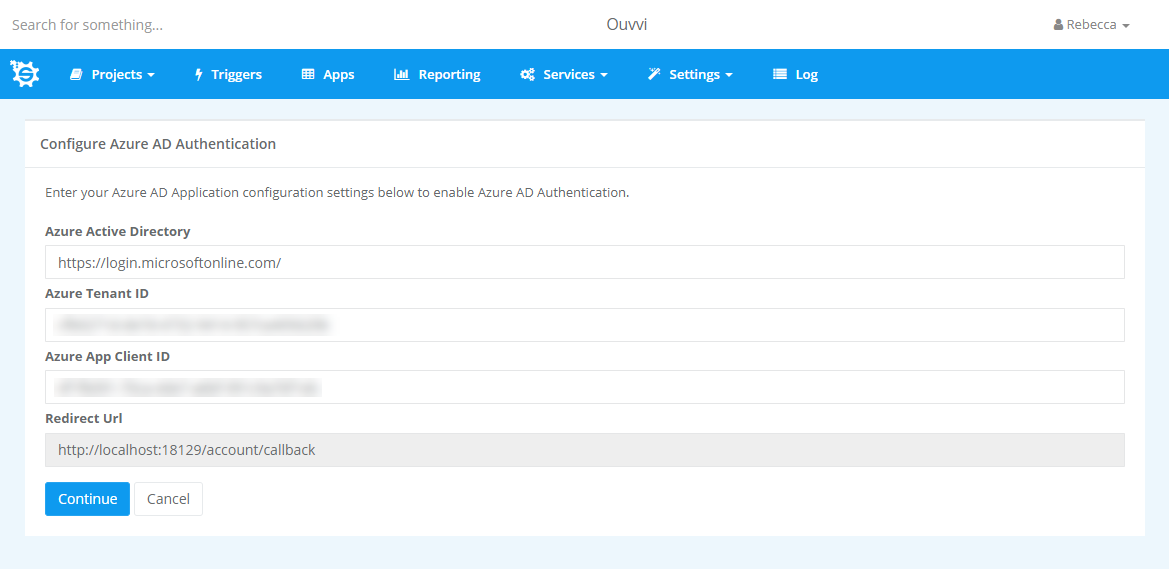
The setup will then guide you to sign in to your Microsoft account and accept the permissions.
You will then need to enter the Client Secret for your Azure App, and click Save to finish the setup.
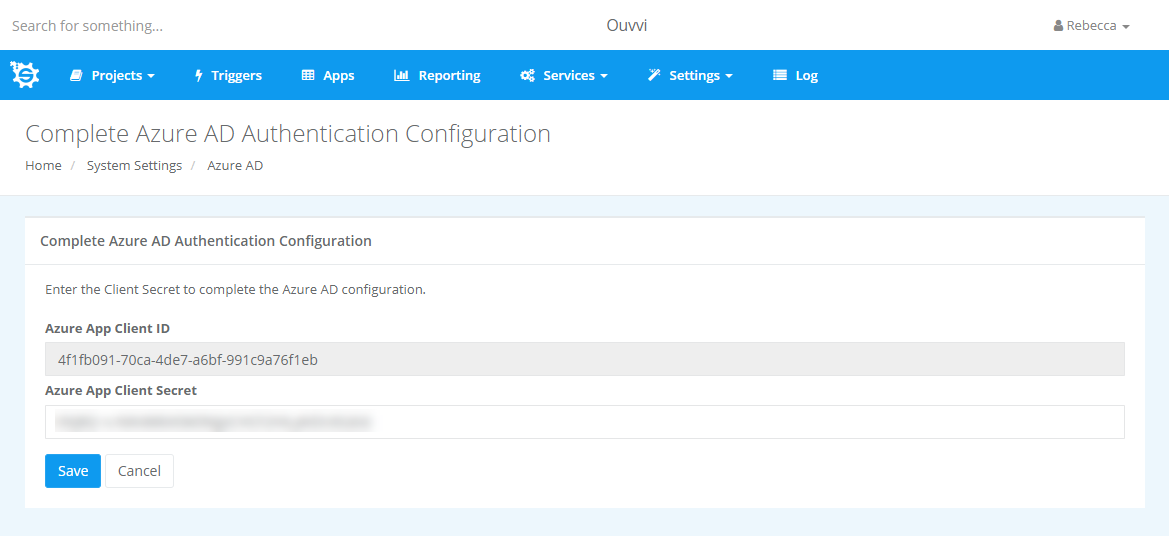
You will then be signed out and will need to sign in again with the account you used to accept the permissions. This will be the default account with admin permissions. You can then specify additional users under the user profiles section by adding their logon name and setting the permission level.
Internal Accounts
Another option is to specify your own user accounts/credentials. To do this change the drop down to Internal Accounts and set the user credentials to act as the default system admin. You can then add additional user accounts to Ouvvi under Settings > User Profiles.
Windows Accounts
To do this, browse to Ouvvi and make sure the Authentication Mode drop down is set to Windows Accounts. Then enter in the local domain user account you want to use as the default admin.
Service Configuration
One of the biggest problems we have is users not completing the Ouvvi setup and wondering why the services don't start. So the main focus was trying to make the service setup and configuration a more guided experience. Ouvvi will now redirect you to the setup page if you have not completed the setup and guide you through adding a Service User to the Ouvvi Profiles.
Forms Authentication
If you click Start Service before finishing the configuration then you will be redirected to the setup page where you will need to configure the default system admin account and finish setting up the database. Once you have completed the setup you can go back to the deployment manager and try to start the service again. If it is successful you will be redirected to the services page and green flags will show to show that they are running.
If you do not have a service user specified then it will redirect to the services page and you can create a new service user by using the button in the browser.
When using Forms Authentication you can also change the Service User Credentials from the deployment manager. To do this right click onto your instance and select Set Service Ouvvi Credentials.
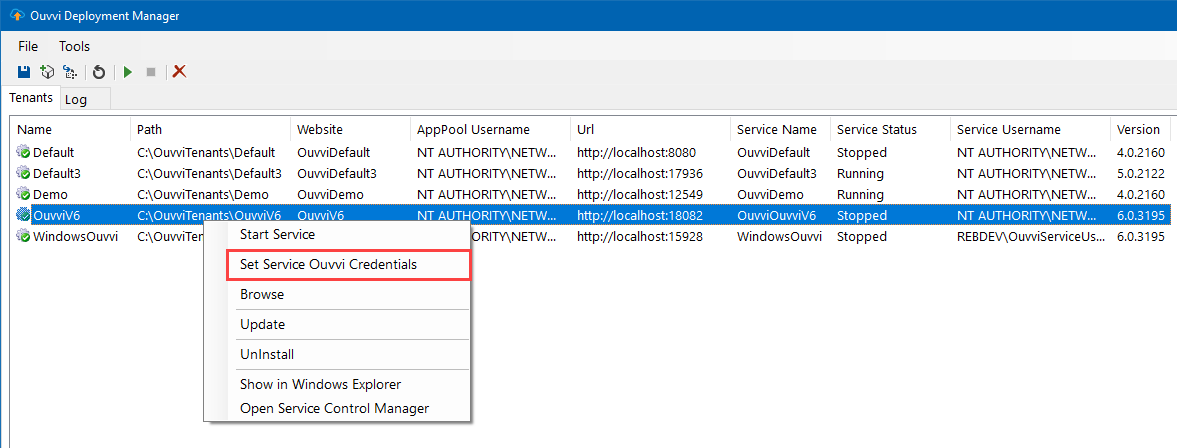
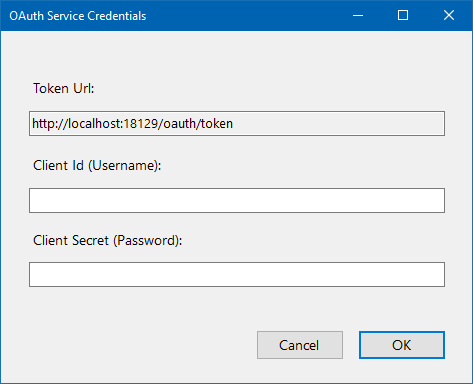
You then specify the Username and Password for the user and click OK.
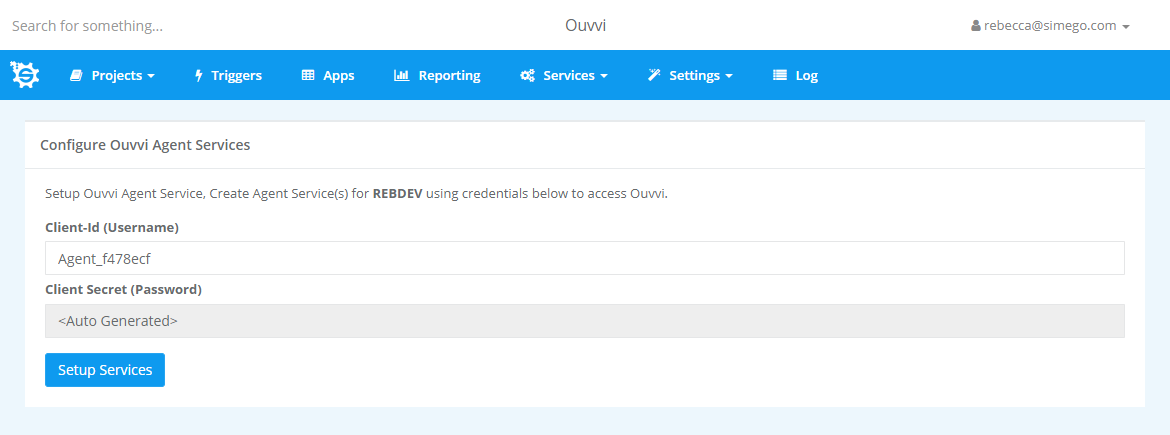
If you have configured your Instance to use Azure AD credentials then clicking Start Service with redirect you straight to the Configure Ouvvi Agent Services page where you can change the username of the agent or leave the default name. This will create a service agent for the machine you are currently on.
Windows Authentication
If you are using Windows authentication, when you have installed Ouvvi and right click to proceed with the setup, if you click onto the Start Service button you will be redirected to the setup page to complete the Ouvvi database setup.
If you have already completed the database setup then clicking Start Service will redirect you to the services page where you can create a new Service agent or see that your services are up and running.
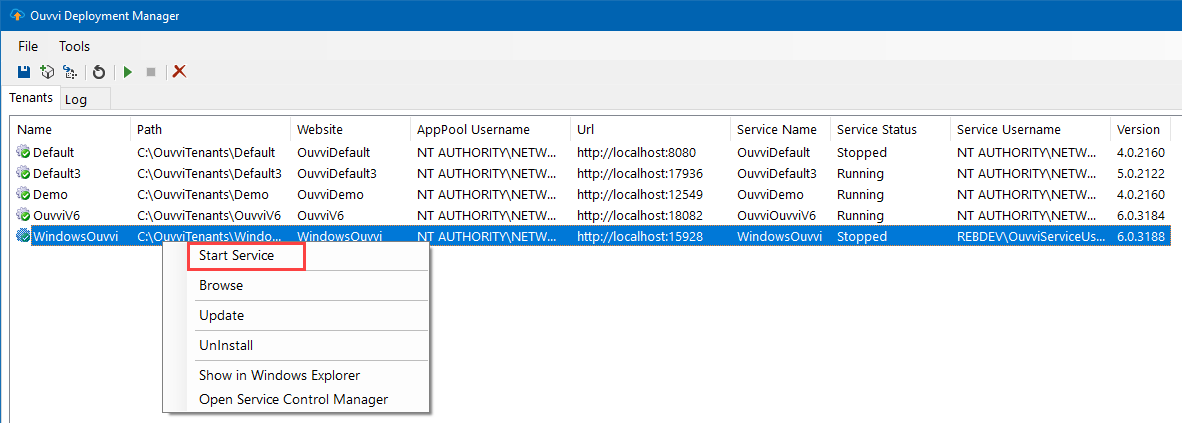
When using windows authentication you need to ensure you enter in the machine name to the Service User if you are not using the default NETWORKSERVICE user.
Connection Library OAuth Connections
A number of the connectors and their UIs have also been extended to support OAuth, this is to ensure that you can keep connecting to the providers you need to.
You can now view, edit and create OAuth connections in Ouvvi without needing to use the Data Sync designer. For a while the UI for editing certain connectors was not available, however all connector types can now be edited within the Ouvvi UI. The connectors now supporting OAuth are: Dynamics, Salesforce, SharePoint, Podio, OData.
Please note that for Dynamics, Salesforce and SharePoint connections in Ouvvi, it is limited so that only the Simego default apps can authenticate on localhost for the redirect URL. For custom apps you will need to specify the redirect URL to use your own host name. This is usually only an issue if you are exposing Ouvvi to the internet (not on localhost).
If you prefer to create your connections in Data Sync then you can continue to do this, additionally you can still also upload and export connection files as normal.
IP Filtering
Another feature now available in Ouvvi is the ability to filter access to Ouvvi by IP address. This works for restricting access when you have exposed your Ouvvi site to the internet. You should still use an SSL certificate when exposing Ouvvi outside of the local machine.
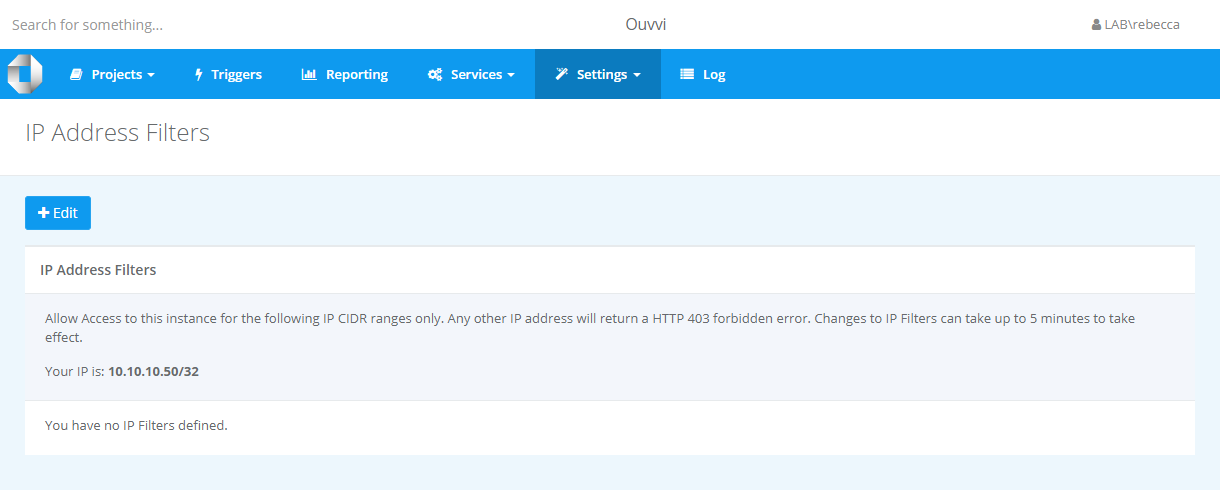
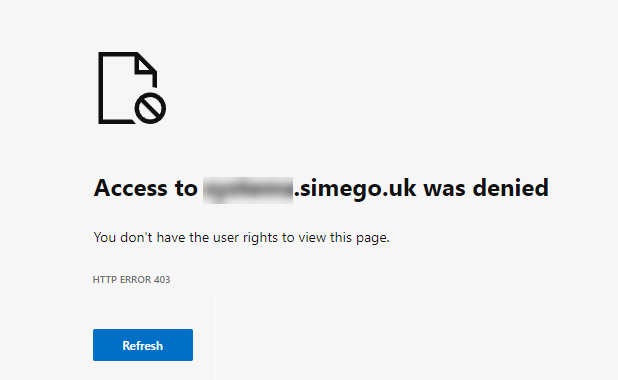
If an IP is not included in the list then access to Ouvvi is disabled and not possible. Users will have the message Access to [OUVVISITENAME] was denied
Note that localhost is always allowed by default to prevent being completely locked out.
To add IP addresses to the list click onto the Edit button and add all the IP addresses you need.
We will continue working on Version 6 into the start of 2023, so if you have any comments or suggestions please send us a message and we can look at adding additional features to the new release.