Import and Export Files using FTP in Ouvvi
FTP is a mainstay of B2B integration and whilst there may be other options to transfer files online, its ability to offer direct B2B connectivity make it a popular choice.
FTP Upload and Download are now included in the increasing number of DS3 Server Project 'Steps'.
This post will demonstrate how to create a project which downloads an xml file from and uploads a csv file back to a FTP server.
The FTP server is configured only to allow secure connections as this is a typical configuration option.
Create a Project to contain the FTP Steps From the Projects Page of DS3 Server, create a new project and name it 'FTP Integration test'.
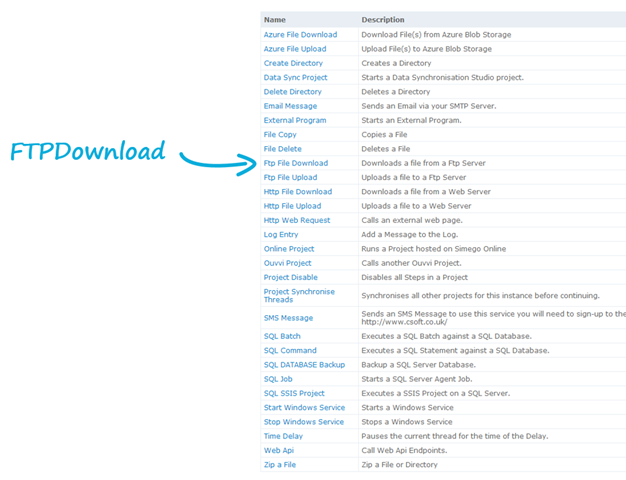
Add a new 'FTP Download' Step

Name the step 'Download File via FTP (s)' and then configure it.
FTP Server File Path
This is the url style path to the file on the FTP server eg. ftp://localhost/data.xml
FTP Server uses Passive Mode
This allows the FTP server to change the port the ftp process is working through. This is normally enabled .
FTP Server uses SSL
If the server is configured to transfer files and authentication details over SSL then you will need to enable this setting.This is normally enabled .
FTP Server accept SSL certificate
It is possible (and likely) that the certificate used to secure the FTP server is not signed by a trusted root authority or is not trusted by your own machine. In this case you can indicate that it is OK to accept this SSL certificate. This is optionally enabled.
Destination Filename
Define the name and location of the file once it has been downloaded eg. c:\temp\medals.xml
Username
Set the username used to authenticate with the FTP server.
Password
Set the corresponding password to used with the Username
Timeout
This is the time in seconds that we will wait until giving up for a response from the FTP server. eg. Normally 30 seconds 00:00:30 is reasonable.
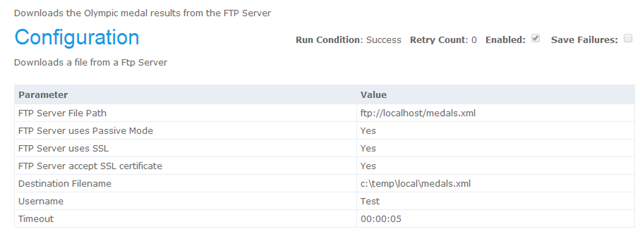
Once you have completed the configuration it should something look like this.

Save the Step.
Add a new 'FTP Upload' Step
We have assumed the there is a corresponding file called medals.csv in a local file system that we would like to upload to the FTP server.
Add a 'Ftp File Upload' step and name it 'Upload File via FTP (s)' and then configure it.
Source Filename
This is the name and path of the file to be uploaded into the FTP Server eg. c:\temp\local\medals.csv
FTP Server Path
This is the url style path of the of the location you want the file uploaded to eg. ftp://localhost/
FTP Server uses Passive Mode
This allows the FTP server to change the port the ftp process is working through. This is normally enabled .
FTP Server uses SSL
If the server is configured to transfer files and authentication details over SSL then you will need to enable this setting.This is normally enabled .
FTP Server accept SSL certificate
It is possible (and likely) that the certificate used to secure the FTP server is not signed by a trusted root authority or is not trusted by your own machine. In this case you can indicate that it is OK to accept this SSL certificate. This is optionally enabled.
Delete Local File after Upload
After uploading you can choose to delete the source file. eg. Disabled
Username
Set the username used to authenticate with the FTP server.
Password
Set the corresponding password to used with the Username
Timeout
This is the time in seconds that we will wait until giving up for a response from the FTP server. eg. Normally 30 seconds 00:00:30 is reasonable.
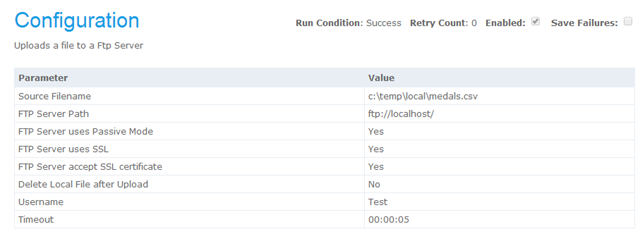
Once configured and Saved the step should look lie this:

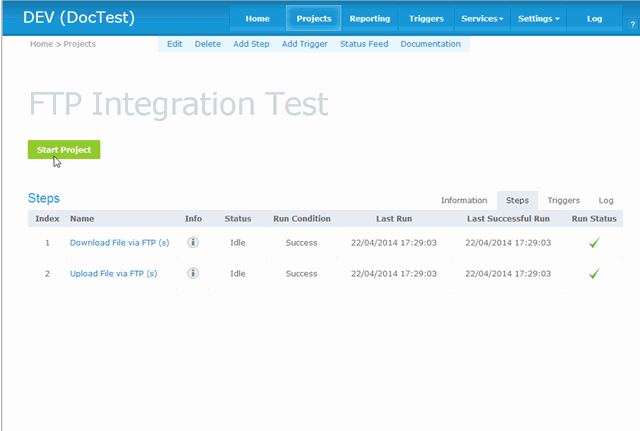
The can now download and upload via FTP with or without SSL transport enabled by running the project.

