SharePoint File Data Source Connector
Data Sync can now connect to a file stored in a SharePoint Document Library and access the data stored within it, without needing to download a copy and reupload it.
We've had a number of enquiries over the years asking for this functionality and now it is available! So hopefully this fills a gap, and you will all find this connector useful.
With this connector you can preview, write to and create CSV, XML and Excel files within SharePoint. It will also handle version control, and you can specify the type of check in to be performed i.e. Minor, Major or Overwrite.
Below we will cover a brief overview of how the connector can be used and a few example use cases. For the full documentation please see our docs site here
Connect to the File
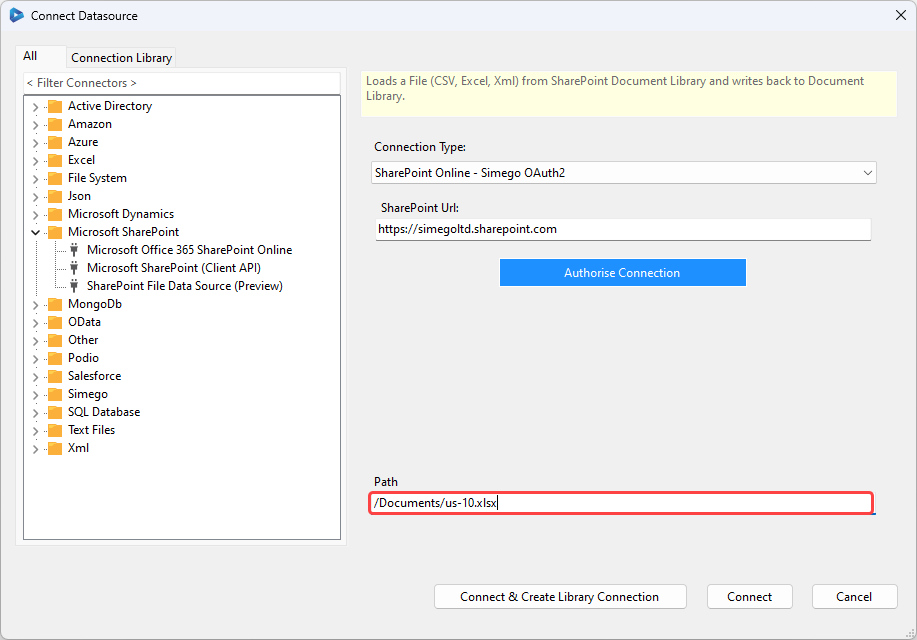
To connect open the data source window, locate the Microsoft SharePoint folder, expand the node and select SharePoint File Data Source. Then select the connection type, by default this will use the Simego OAuth option but you can also choose to use a custom OAuth connection.
Enter in the base URL to the SharePoint site. This can be either the root site or a sub-site and should be in the format https://<domain>.sharepoint.com/<site1>/<site2>.
Then click Authorise Connection to enable the connection to SharePoint. Once the connection has been authorised you need to enter in the path to the file you want to connect to. This should include the folder paths, the file name and the file extension. For example the path could be /Documents/ContactRecords/Contacts_04-2024.csv.
You will need to build this path yourself by navigating through your SharePoint site to the file, making a note of each folder and the order you pass through. The link that can be gathered from the file in SharePoint directly is not user friendly, so you should use a combination of the URL and the filename and extension.
The final connection should look similar to the image below:
The connector also supports the connection library. So you can save the connection to the site and just need to specify the path and file type in future connections.
You can find the documentation pages on this connector on our Docs site here.
Use Case Examples
Below we discuss a few examples of how this connector could be used in day to day business scenarios to help prompt you with some ideas. For example creating a backup of a SAAS system, making data available outside of systems that require licenses, feeding data into Power BI models and so on.
Create New Files Within SharePoint for a Daily Sync
You could use the SharePoint file connector to add a copy of the data edited that day to a folder within SharePoint. For example you could run a daily sync to capture the contacts added to a contact list in Dynamics today into an XML file.
To do this you would connect to the Dynamics Contact entity as the source, and a template target XML file that has the column names of the columns you want to capture within SharePoint.
We can then add a filter to filter for only the contacts that have been modified today using modifiedon >= DATEADD("day",-1,TODAY()).
Next make sure to map the source and target columns in the schema map and ensure a key column has been selected.
Then using project automation you can override the filename to add today's date to the file name, and specify the path it should be saved to.
If the folder doesn't exist yet, Data Sync will create this in SharePoint for you. We also need to remember to escape the backslashes in the path with another backslash as it is using C#.
public override void Start()
{
	DataSourceB.Path = $"\\Contacts Backup\\UpdatedContactRecords-{DateTime.Today.ToString("yyyyMMdd")}.xml";
}
The project configuration should then look similar to the below image:
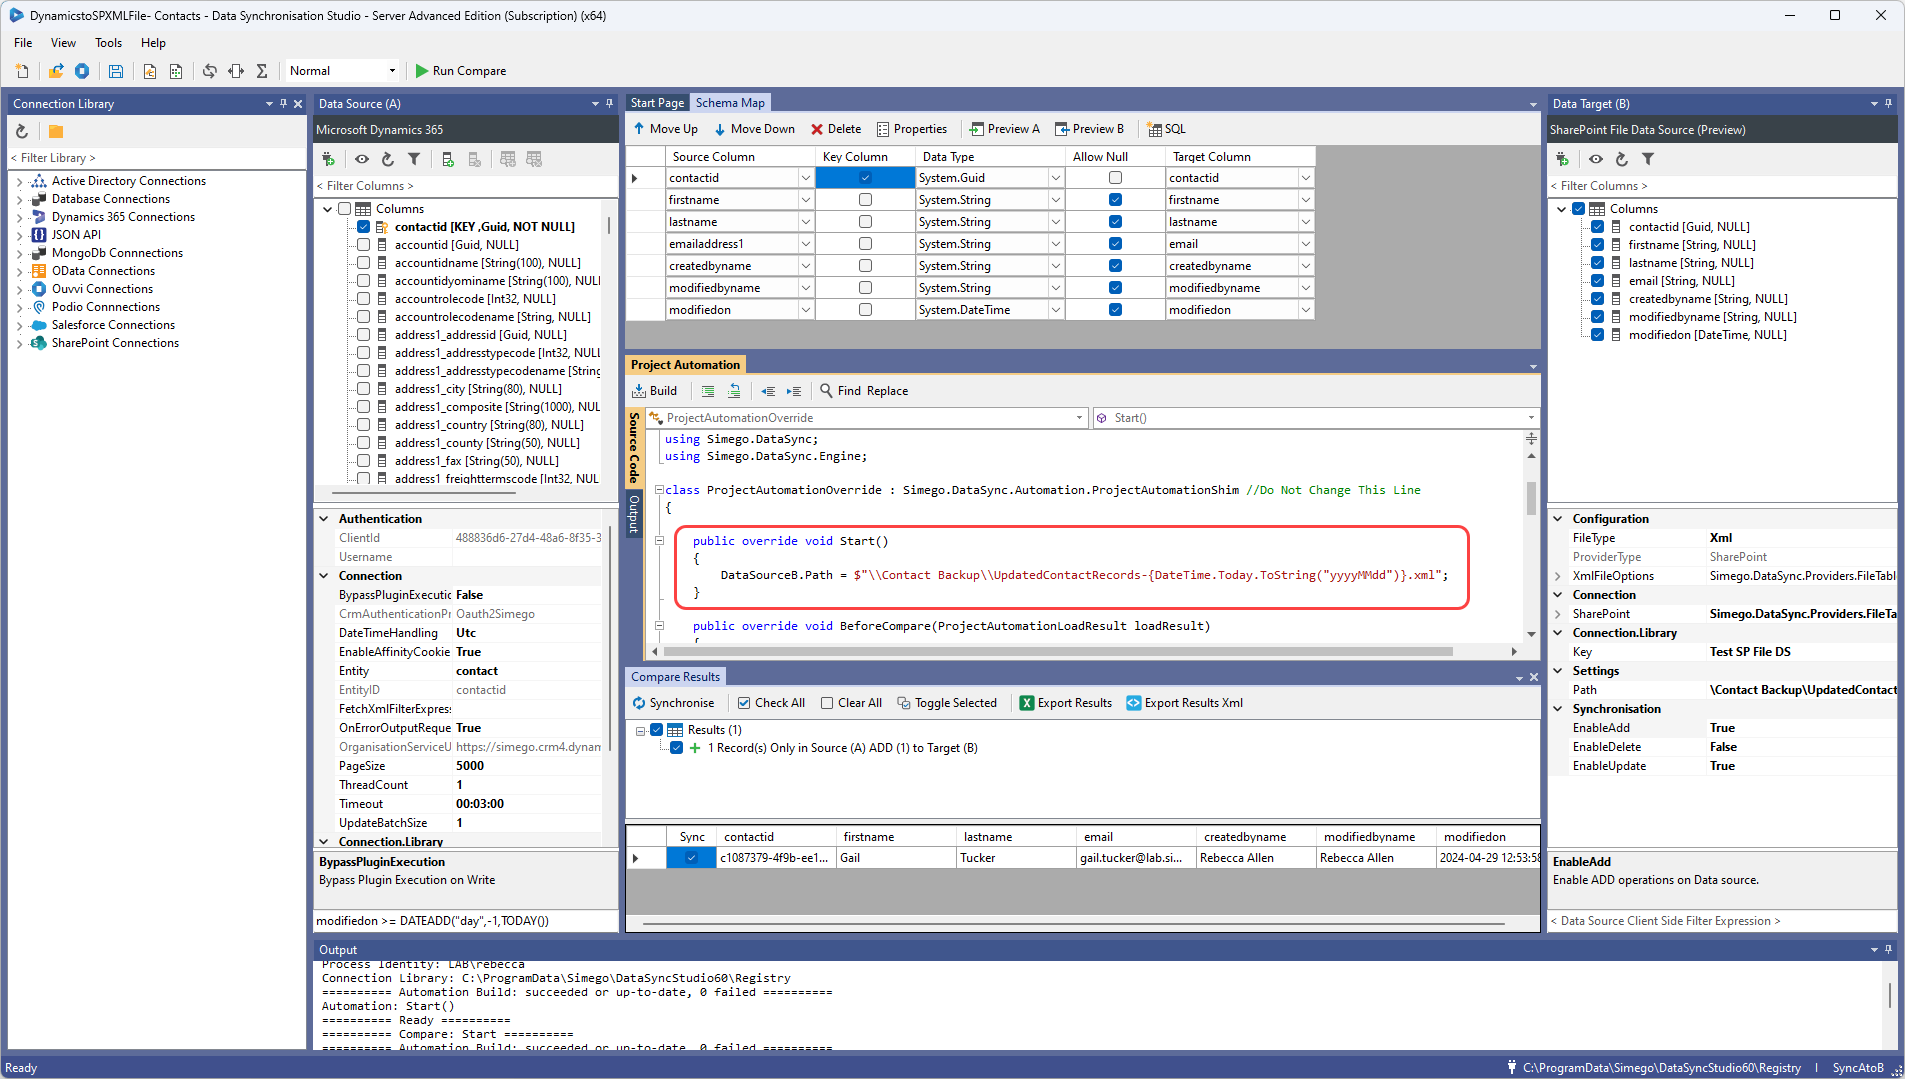
Now when you compare and sync the results, the file will be created in SharePoint and the data uploaded so that you have a full record of the data from that day.
Template File Doesn't Exist
If the template file you are connecting to doesn't exist yet, you can easily make a template document using the export options in Data Sync. Add the source columns you want to include in the file to the schema map and then use the Preview A export options from the schema map to export a copy of the data set as an XML/CSV/Excel file.

You would then need to upload this file into SharePoint and this will act as a template file to connect the target data source window going forward.
Update the base file for a PowerBI model
You could use Data Sync and the SharePoint file connector to keep a PowerBI model up to date. If you set up a regular sync so that the file has the most up to date data, then Power BI can pull data from it when the model refreshed as and when it is needed.
In short you would use Data Sync to keep the file data up to date and then just refresh the model to get the updates.
In Data Sync the project would be configured so that your source data feeds into your file within SharePoint on the target. You can set this project to run on a regular basis e.g. at the beginning and end of the day to capture the changes, and the file be set as the data source in PowerBI.
You then just need to connect your Power BI model to the file and refresh it as needed. We have a quick bit of guidance on connecting the file to Power BI below.
Connecting to the file in Power BI
Sometimes connecting the document in SharePoint to Power BI can throw a few errors. Most of these revolve around getting the right path to the file, so we will briefly cover how to do this.
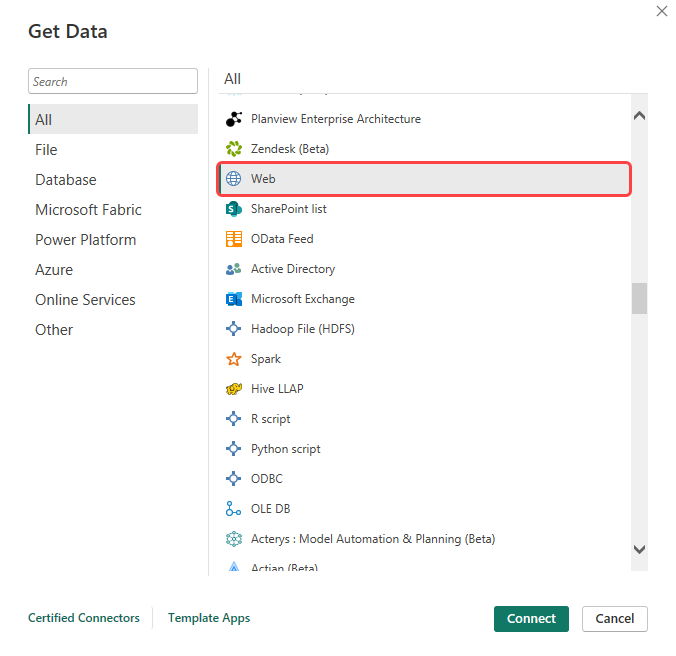
To connect to the file in Power BI click onto Get Data. Then select Web from the options list and click Connect.
You now need to enter in the path to the file in SharePoint.
The best way to get the right path is to open the file in the desktop app from SharePoint. Then go to File > Info and select Copy Path.
You then need to remove web=1 at the end and the connection should authenticate without any issues.
This should look something like the following:

Then follow through the wizard to sign in and you should now be able to load or transform the data as needed.
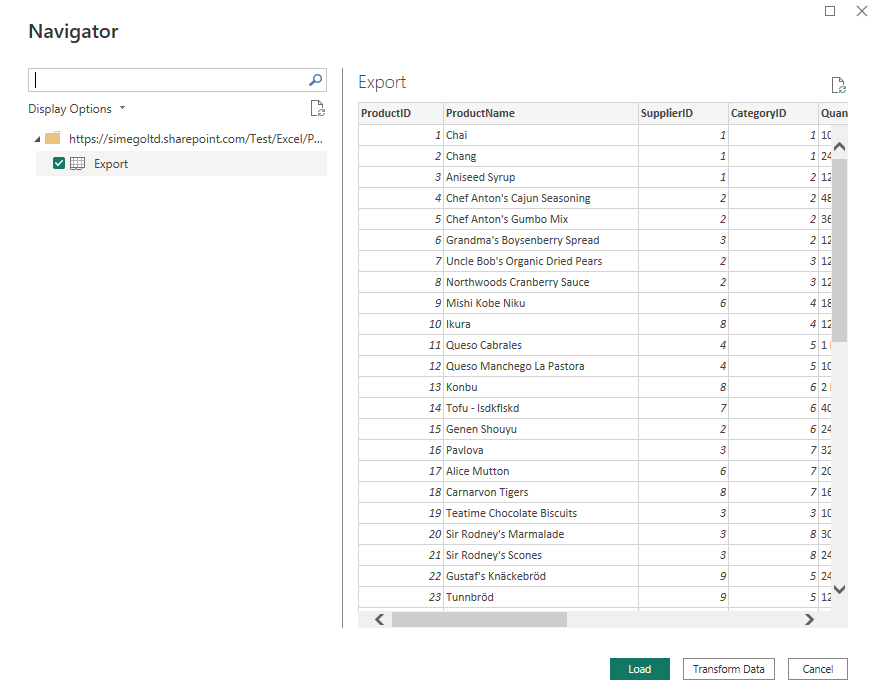
Once you have created your model/report in PowerBI you can simply refresh the dataset to get the latest updates whenever you need an updated report.
Create a Backup of your SAAS Systems
Another option is that you could use the SharePoint File Data Source connector to create a backup of your SAAS systems.
For example you could have an XML file that holds all of your contact records from Salesforce. You can make this possible by connecting your source to the Salesforce Contact object and the target to the XML file in SharePoint that will hold the records.
Map the fields you want included in the sync in the schema map and set a key column that link the results (this is usually an ID but could be something different so long as it is unique). Then simply compare the results and sync the changes. Remember that by default Data Sync disables deletes so any records that have been removed from your Contact object will still exist in the XML file unless you enable deletes.
We can use project automation to add the date onto the file name and set the path for the backup. You might want use Data Sync to add the file into a specific folder if you are running it multiple times during the day.
public override void Start()
{
	DataSourceB.Path = $"\\Salesforce Backup\\ContactObject-{DateTime.Today.ToString("yyyyMMdd")}.xml";
}
You can make use of Ouvvi or the Run Tool to schedule the project to run on a regular basis. As a backup you might just want to run it at the end of the day, or every hour if the changes are frequent.
If the file doesn't exist yet you can easily make a template document by adding the fields you want to include in the file to the schema map, and then use the preview export options to export a copy of the data set as an XML file. You would then need to upload this file into SharePoint and this will act as the template file going forward.
Make Data Available outside of Dynamics for Other Users
A slightly different use case is to expose data outside of Dynamics so users can view without a dynamics license - e.g. Exporting a client list into an excel spreadsheet in SharePoint.
You can connect your source to the client list in Dynamics and the target to the file you want to synchronise the data to. Map the columns you want to include, run the compare and sync the results.
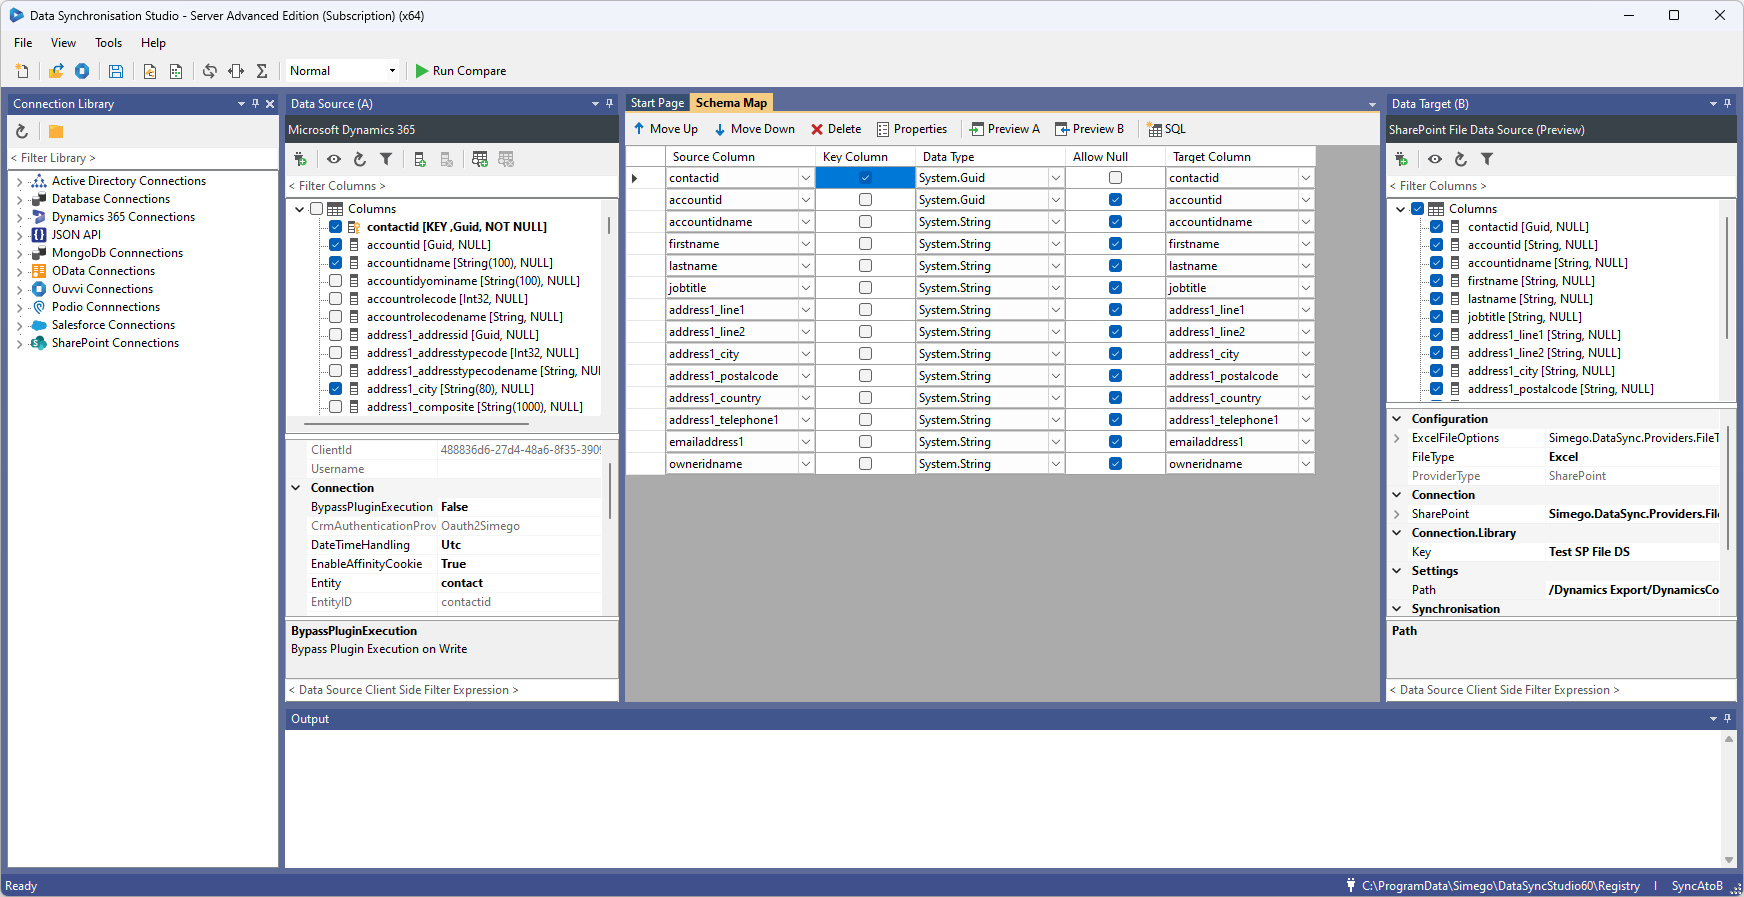
Now your employees/ users can view the data without needing to sign into Dynamics. If you also schedule the synchronisation to run every 30 minutes to 1 hour, using either Ouvvi or the Run Tool, then your file will remain up to date for the users. You can set the schedule to meet your needs depending on how frequently the data changes.
It really is that easy!
Make Employee To Do Lists to Split Tasks
If you have a small team that needs specific tasks (e.g. a call list) splitting up into separate files for each employee, then you could use multiple Data Sync projects to do this.
To do this you would have one project per employee that creates a spreadsheet they can work from without conflicting with the other users. You would start by connecting to your source data, which for this example we are saying is a call list that has a user assigned against each account. Then connect the target to a template excel spreadsheet found in SharePoint, that has the columns you want to be included.
Next you would add a filter on the source to only return records for the first user you are wanting to create the file for, then map the columns between the source and target, and make sure to select a key column to identify each row as unique. This might be an ID column or a composite key of the account name and date (if there is only 1 record per account per day). Finally you can use Project Automation to write the file to a specific path and add the employee name to the file being created in SharePoint. This would use the same code explained in the previous example where we created new files with today's date only this time it has the date, an employee name, and a specific folder defined in the path. You can see an example shown below:
public override void Start()
{
	DataSourceB.Path = $"\\To Do List\\Employee123\\CallList-Employee123-{DateTime.Today.ToString("yyyyMMdd")}.xlsx";
}
Alternatively for a quick and simple option just export the data to the excel file, include the employee names and let the employee filter the excel document to find their tasks.
Snapshot SharePoint List Data
An alternative use case is to take a snapshot of some SharePoint list data, so that you can look back and see the data that was contained in that list on a particular day. This could be for audit purposes, or simply as a backup.
To do this you would connect your source to the SharePoint list and connect the target to a template file in SharePoint that has the columns you want to include
If the file doesn't exist yet you can easily make a template document by adding the columns you want to include from the source, to the schema map and then use the preview export options to export a copy of the data set as an XML/CSV/Excel file. You would then need to upload this file into SharePoint and this will act as a template file to connect the target data source window going forward.
Make sure the mapping is correct in the schema map and select a key column to identify each row as unique.
You will then need to use project automation to add the date onto the filename and determine the path the file should be created at.
You can do this by adding the following line of code but make sure the extension matches your file type. The below example is for an excel file so has xlsx listed.
public override void Start()
{
	DataSourceB.Path = $"\\SharePoint SnapShots\\MyListSnapShot-{DateTime.Today.ToString("yyyyMMdd")}.xlsx";
}
This will now create a new file at the path you defined when you run the synchronisation, and connect to it as the target file.
Export from Active Directory
LDAP filter for admin or who logged on today for audit purposes.
A final example could be to export data from Active Directory. This might be a file for auditing the administrators of a group in Active Directory or for who logged in that day.
This Data Sync project would be connected to Active Directory as the source and export the data to a file within SharePoint to act as an audit file for that day. You could then add in date to the file name using project automation to create new file.
public override void Start()
{
	DataSourceB.Path = $"\\Active Directory Audit Data\\UsersLoggedIn-EOD-{DateTime.Today.ToString("yyyyMMdd")}.csv";
}
To get the logged in users you could simply apply a filter to your source data (Users in AD) to only return those with a value of Todays date for the DS-LastLogon attribute.
This filter could look like this: DSLastLogon >= DATEADD("day",-1,TODAY())
Then map the columns between the source data and target file in SharePoint, run the compare and Sync the results.
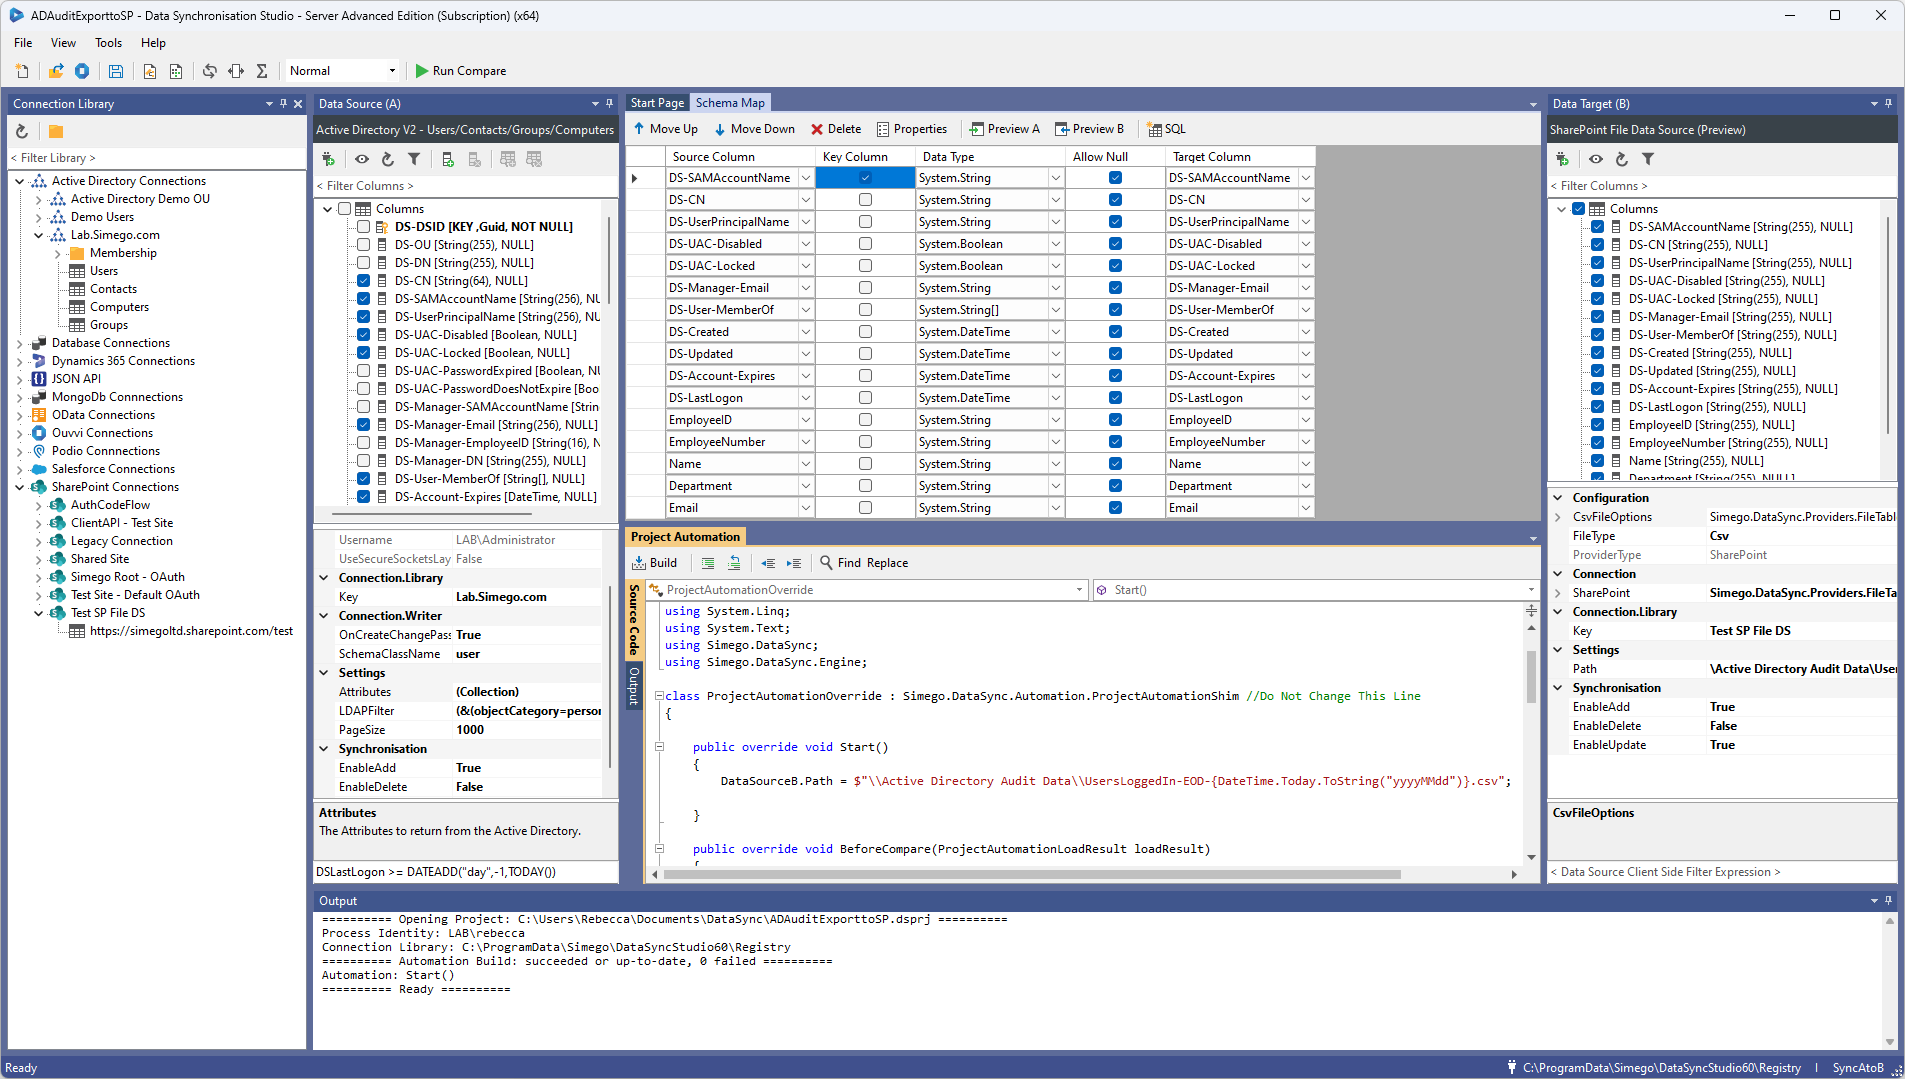
To get the admin members into a file you could connect to the users list and use an LDAP filter to only return the only return Administrators. Then follow the same steps as above and you will get the file created in SharePoint.
We would then recommend scheduling the project to run so that it runs every day at the end of the day to give you a full audit history. You can do this with either Ouvvi or the Run Tool.
If you have any questions about how to make a specific scenario work for you, send us an email and we will be happy to help get you started.
