Handling SharePoint Lookup Columns
There are multiple types of columns in SharePoint, some of which depend upon looking up data in another list. Below we are going to cover how to use Data Sync to write data to these columns and a few of the different options available depending upon your setup.
The article covers general SharePoint lookup columns, People Picker columns and Managed Metadata columns. We also cover how to lookup data in a different SharePoint site if you are not already connected to it.
It's a big topic but you will find loads of useful content under each subheading.

Contents
- Requirements
- Importing Data into SharePoint Lookup Columns - Automatic Lookups
- Importing Data into SharePoint Lookup Columns - Manual Lookups
- Working with People Picker Columns - Lookups into the UserInformation List
- Adding Data to a Managed Metadata Column (TaxonomyList)
- Lookups from a SharePoint Subsite
Requirements
Before getting started you need to ensure you have the following:
- Access to SharePoint
- Windows 10 or Windows Server
- Downloaded & Installed Data Synchronisation Studio
- Saved your connections to the Connection Library (makes for easy lookup setup)
If you do not have Data Synchronisation Studio you can get a free evaluation edition.
Importing Data into SharePoint Lookup - Automatic Lookups
SharePoint Lookup columns, which can either be a single value or multi-value field, will show the data in a user friendly format in the browser. However under the covers SharePoint is actually returning the ID of the item combined with the item name. In order to write data back to these columns you need to present the data in the internal format SharePoint uses (not the user friendly name).
The SharePoint Online and SharePoint Client API connectors have an inbuilt feature to automatically match and link lookup columns based on the value associated with the list. For this to work the value must be an exact match to the value in the defined title column for the lookup in SharePoint.
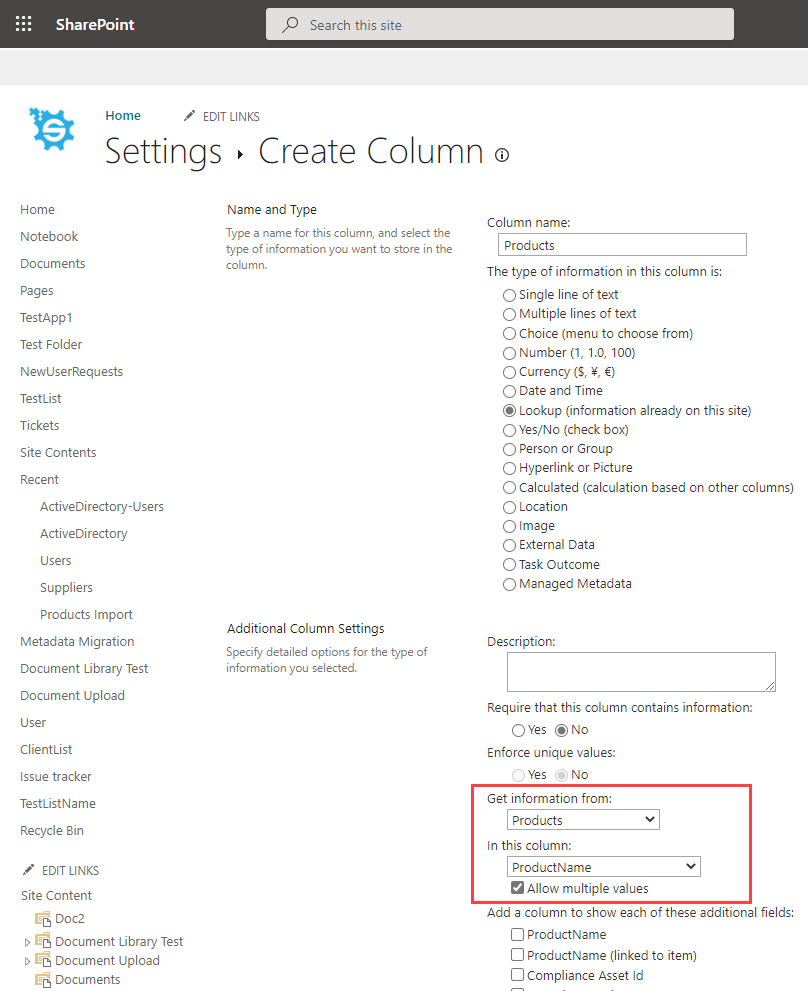
You can find out which column is the defined column for the lookup under the column settings.
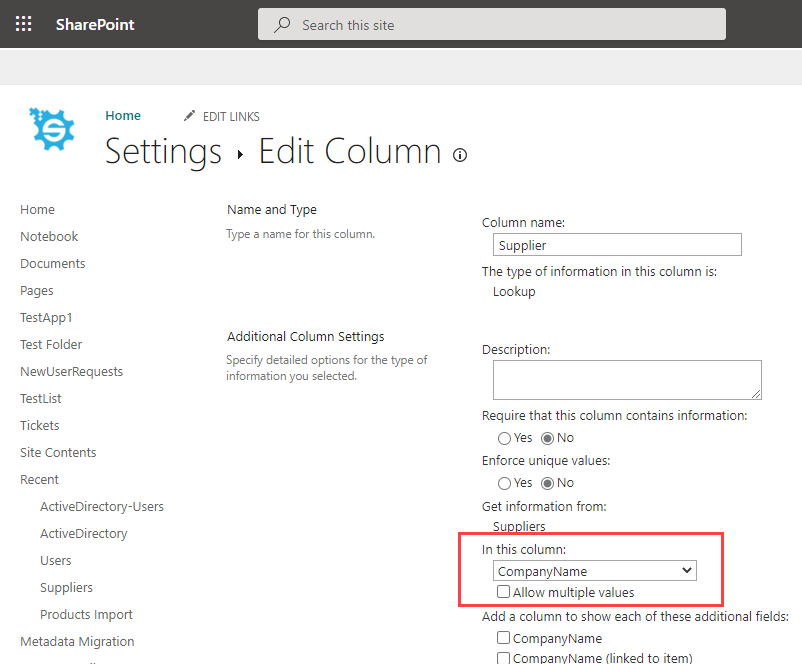
During the Synchronisation the list items are downloaded from the related SharePoint List, Data Sync then indexes this list to get SharePoint's list ID number to assign to the item being linked. This is why the items must be an exact match and they must exist for the link to be successfully created.
If the value does not exactly match, e.g. an email address instead of the user name, then you will need to manually lookup the data.
Below I will show you how to configure your project to use the automatic lookup feature for single items and multiple items.
Connect to your Source and Target
Start by opening Data Sync and connecting to your Source data and your SharePoint site as your Target. In this case we are connecting to a list named Orders and the lookup to the products is configured to use the ProductName column.
This will work for the automatic lookup feature as the source data uses the Product Name the same as the lookup is configured in SharePoint.
Map your Columns
Now map the columns from the source to the target and make sure to select a key column that is unique and can be used to identify each item. For this example the schema map has only two columns; the Order ID and the Products in the order.

Compare & Sync
The next step is to compare the source and target, and preview the data changes to be made. To do this click Compare A > B in the toolbar.
This will return a list of results showing the differences between the source data and the data in SharePoint. Click onto the green plus to view the additions, the blue diamond for the updates, and the red minus for the deletions.
Deletes are disabled by default but will still show in the list if there are any records in your list that are not listed in your source data. To enable deletes set EnableDelete to True in the target connection properties.
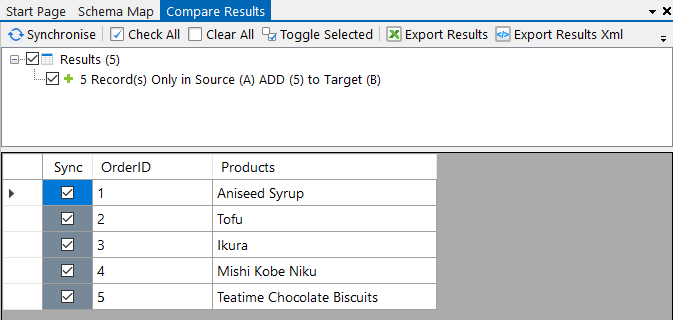
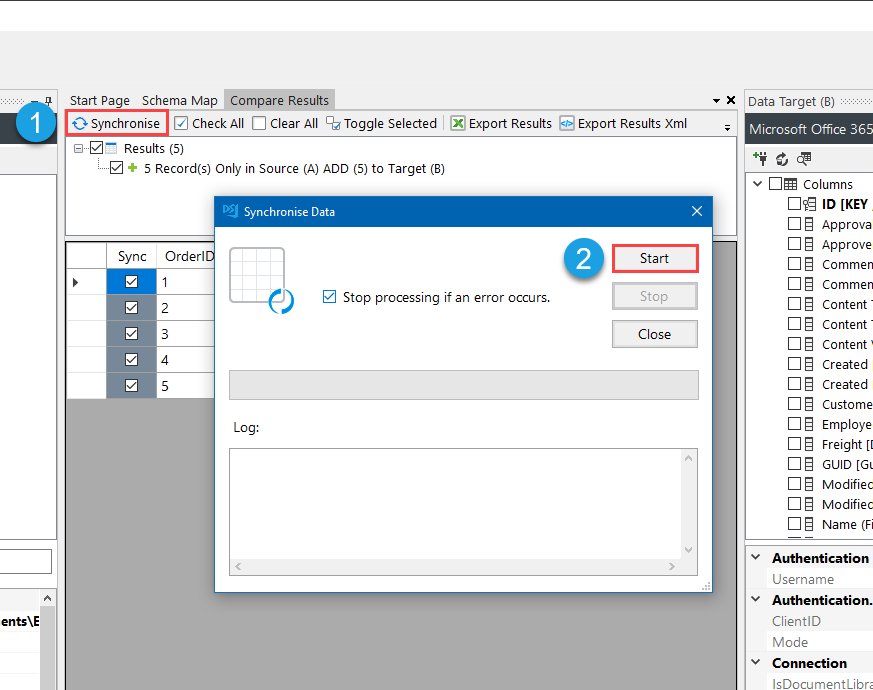
As the data looks correct, we can click Synchronise and then Start to begin the sync.
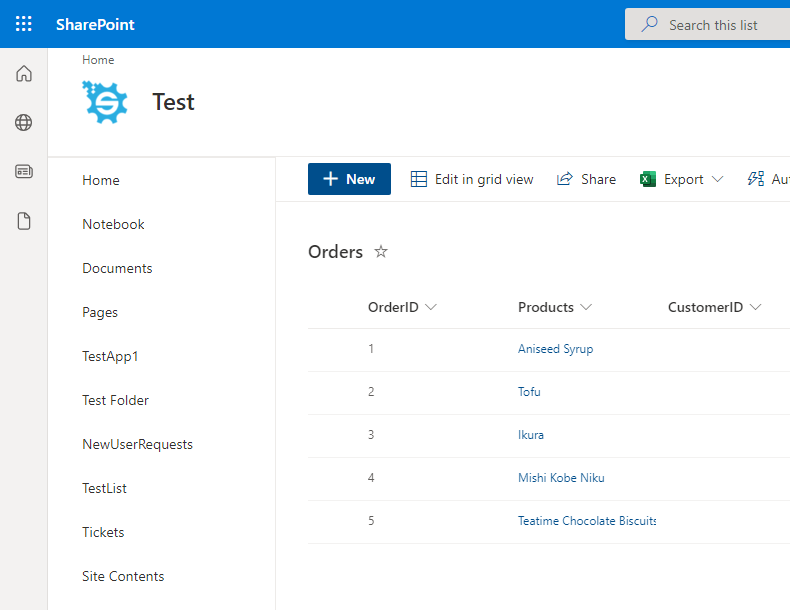
Once that has completed, opening the Orders list in SharePoint shows us that the data has been added successfully.
Multiple Items in a Column
If you have multiple items in a column then the process is the same but you need to ensure that each item is separated by a semi-colon (;).
In this example we have a list of orders which contain multiple products. Each product is separated by a semi-colon if there are multiple items in that cell.

Just follow the same steps as described above and your data will be written to SharePoint:
1- Connect to your Source data and to your SharePoint list
2- Map the columns in the schema map
3- Compare the datasets
4- Synchronise
If you are having problems where the data isn't being added to SharePoint, double check what column is being used to lookup into the list in SharePoint and check that the data is an exact match to your source dataset.
Importing Data into SharePoint Lookup Columns - Manual Lookups
SharePoint Lookup columns, which can either be a single value or multi-value field, will show the data in a user friendly format in the browser. However under the covers SharePoint is actually returning the ID of the item combined with the item name. In order to write data back to these columns you need to present the data in the internal format SharePoint uses (not the user friendly name).
Here I am going to show you how to discover the internal format and how you can manually lookup the item ID from SharePoint using Data Sync.
Connect to your Source and Target (SharePoint)
Start by opening Data Sync and connecting to your source data. In this example we have a list of products with a supplier name that we want to add to SharePoint. Our supplier column in SharePoint is a lookup column linked to the supplier list.

Then connect your target to your SharePoint list.
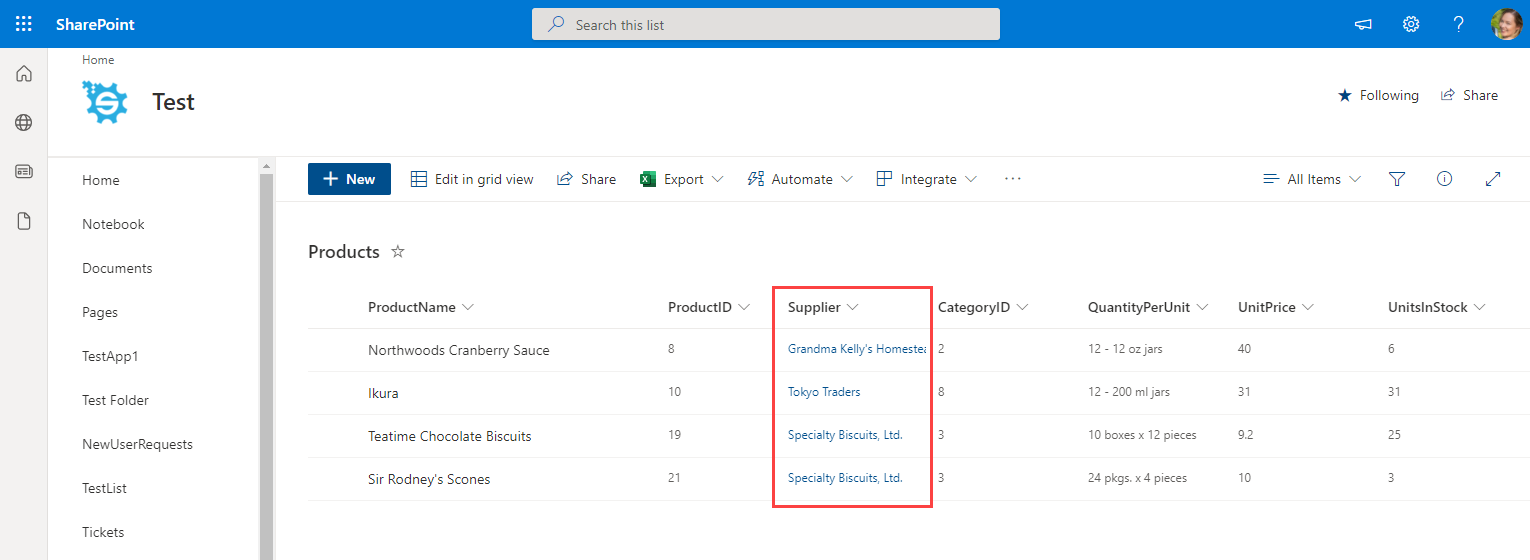
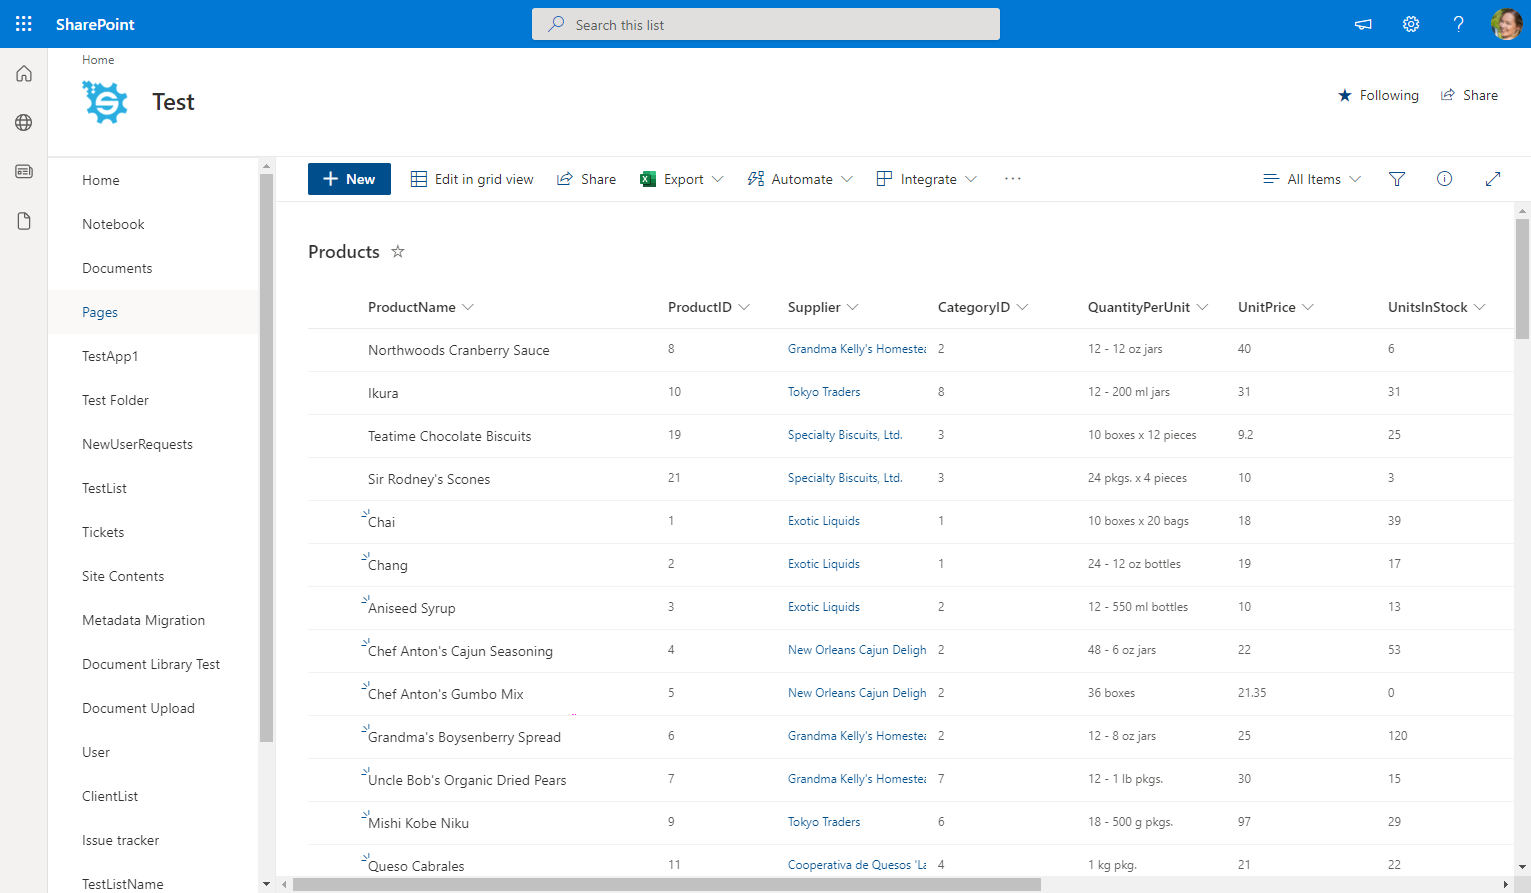
The SharePoint List we are connecting to in this example is a products list where the Supplier is the lookup column. Rather than showing the ID number the column shows the supplier name by looking up into the supplier list on the same site.
Below you can see what the data already in our list looks like:
Reveal the RAW data
SharePoint uses an internal format for Lookup Values similar to 1;#Value One where the number represents the ID value of the item in the related list and the text is the SharePoint title field of that item.
To set lookup values you need to build this string and map it to your SharePoint column. I'll show you how to do this in a moment.
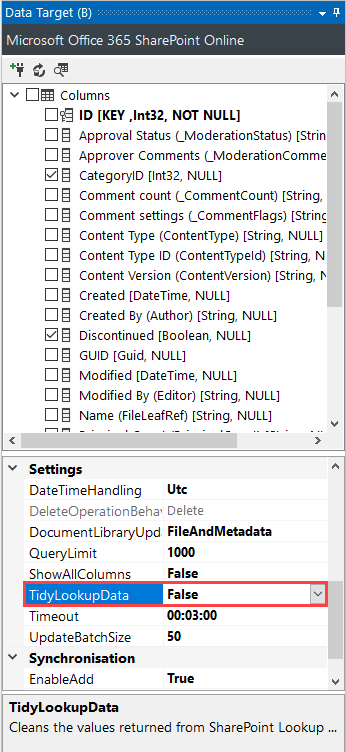
By default Data Sync will hide these column values and just extract the text value, so first you need to disable this by setting TidyLookupData=False on your SharePoint connection.
This setting can be found in the connection properties below your target columns in the data source window.
Check the Format
To make sure you get the right format it is best to manually add a value to your list (in SharePoint) and then use the Data Preview feature in Data Sync to see the data that SharePoint returns. This will show you the format that the value is returned, which should be similar to 1;#Value One.

Columns with multiple values will be separated by a semi-colon and #, e.g.
ID;#Value;#ID;#Valueso you will need to lookup each item and return it in this format. You can format multiple values using Dynamic Columns.
Lookup the ID of the Record
Now we need to create a lookup on the source column to return the SharePoint ID of the supplier in the Suppliers list. The easiest way to do this is by dragging the appropriate SharePoint list from your connection library onto your source column and then configuring the lookup so that the Lookup Data Type and Lookup Target Column matches your source data.
Lookup using the Lookup Button
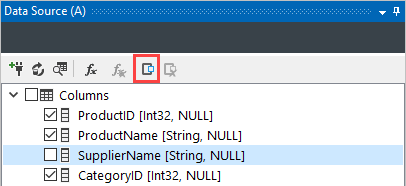
Alternatively you can configure a lookup to the list manually by using the Add Lookup button in the datasource window. Select the column with the data to lookup and click onto the Add Lookup button.
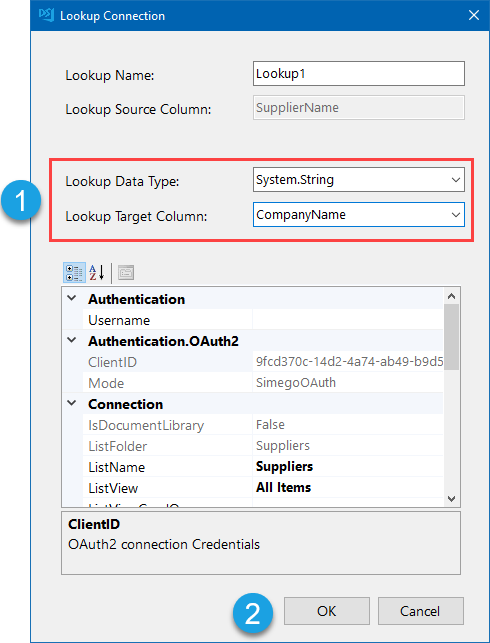
Then connect to your SharePoint site and set the Lookup Data Type and Lookup Target Column to be the one that matches your source data. In this example we are matching on SupplierID but this could be a text value it will just depend on your datasets.
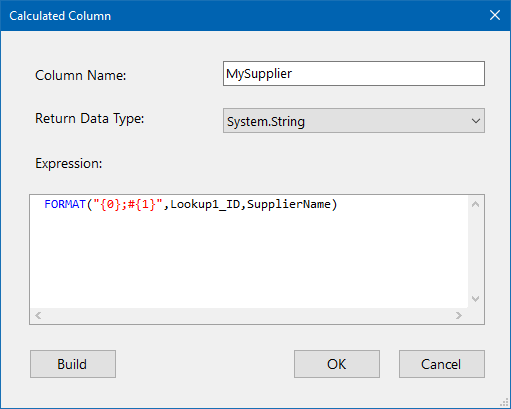
Now we need to create a calculated column which will format the value into what SharePoint is expecting. To create a calculated column click onto the fx button in the source toolbar.

An example of the function you could use is:
FORMAT("{0};#{1}",Lookup1_ID,Lookup1_CompanyName)
If your source contains null values you will need to handle those. An example of the function you could use for this is:
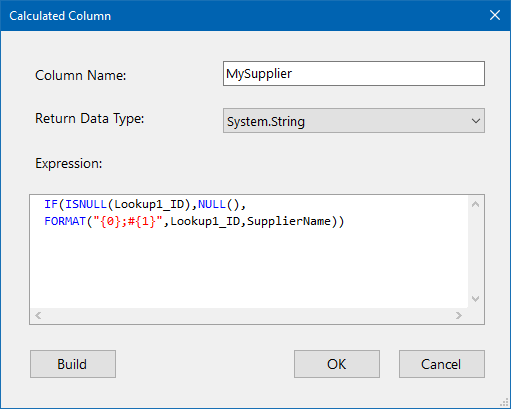
IF(ISNULL(Lookup1_ID),NULL(),FORMAT("{0};#{1}",Lookup1_ID,Lookup1_CompanyName))
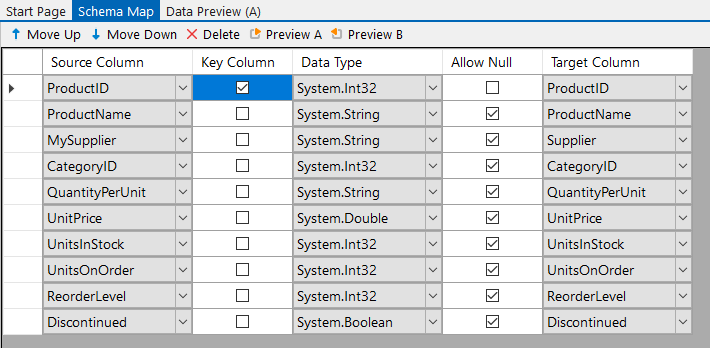
Now add your calculated column to the schema map and map it to the corresponding SharePoint column. In this example we map the calculated column MySupplier to Supplier
Lookup Manually using Calculated Columns
Another option is to specify the lookup within a Calculated Column function. For this we can use either LOOKUPA or LOOKUPB. For this example, looking up into SharePoint when SharePoint is the target, we will use the LOOKUPB function.
The syntax for this function is:
LOOKUPB(column, list, WHEN(column, value))
Where we first define the column to return, then you specify the list to lookup in, and finally the columns to match. This would be the source column you are using to get the values to lookup and the column from the lookup to match it to.
I'll show you an example of an expression you might use below. We also cover how to look up data in another SharePoint site or sub-site in this section of the post.
To create a calculated column click onto the fx button in the source toolbar.

Now enter in a name for the new column, this needs to be unique and not already exist in your source, and make sure that the data type of the colum is correct for the data you will be returning. Then type in the function to lookup the data.
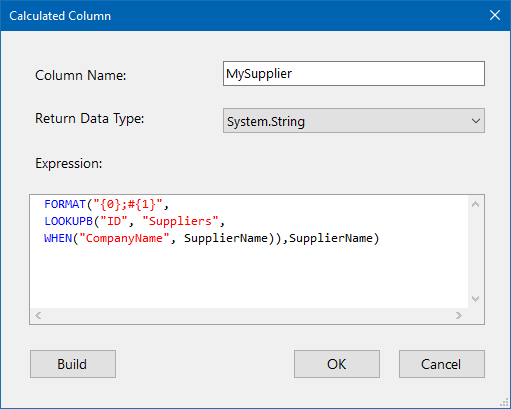
To lookup the ID in the Suppliers list (found in the site we are connected to in the target) where the SupplierName is equal to the CompanyName in the suppliers table the function we would use is:
LOOKUPB("ID","Suppliers",WHEN("CompanyName",SupplierName))
This is logically equivalent to the SQL statement:
SELECT ID FROM Suppliers WHERE CompanyName = ?
We can then take this a step further and format the value in the same statement. The FORMAT function will return the values in the format specified. So for this column we need to return the ID followed by ;# followed by the name of the supplier.
The full statement, including the lookup, will now look similar to:
FORMAT("{0};#{1}",LOOKUPB("ID","Suppliers",WHEN("CompanyName",SupplierName)),SupplierName)
Now add your calculated column to the schema map and map it to the corresponding SharePoint column. In this example we map the calculated column MySupplier to Supplier

Compare and Sync
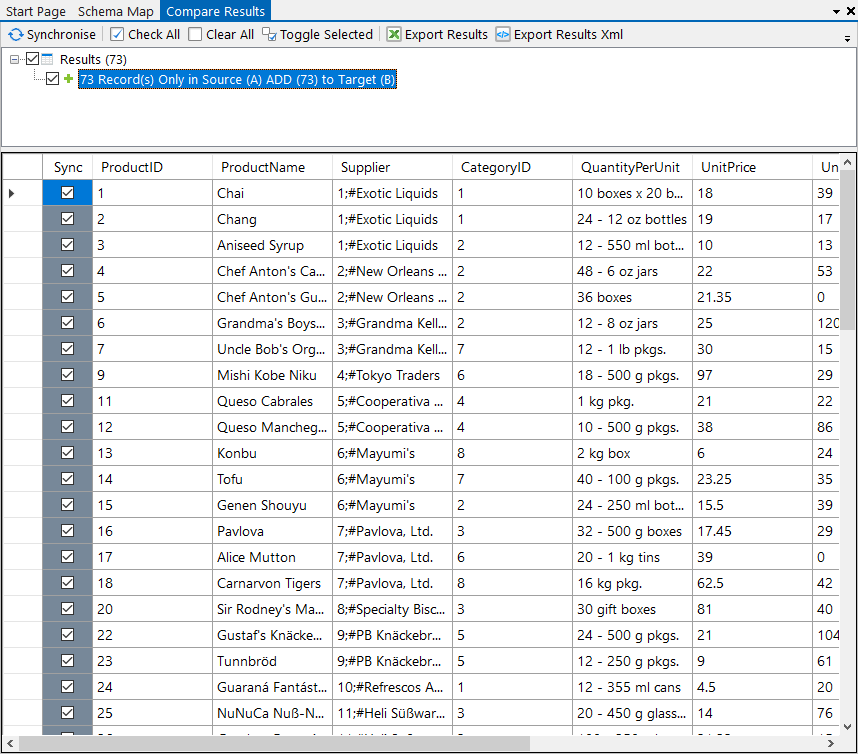
Click the Compare A > B button in the toolbar to run the compare. We can see that there are 73 records to add to SharePoint and clicking on to the green plus will enable us to preview the data that is being added to make sure it is correct.
If there are any updates then click onto the blue diamond to show the updates to be applied. Please note deletes are disabled by default but will still show in the list if there are any records in your list that are not listed in your source data.
When you are ready to add the data to SharePoint click Synchronise and then Start to begin the sync.
The records are now visible in the list and the lookup for the supplier name was successful.
The video below shows the process of creating a lookup to assign a supplier to a product in a lookup column. It shows how to format the value so that it is in the format SharePoint is expecting, and how to diagnose and resolve some of the problems you might encounter such as Null values.
Working with People Picker Columns - Lookups into the UserInformation List
The People Picker column is essentially a lookup to another list in SharePoint, specifically into the User Information List. In your browser SharePoint will return the title column for each user, but behind this it is actually returning the ID and title of that item in the format ID;#Value.
To write back to this column you need to lookup the ID and return the data in the format SharePoint expects ID;#Value.
We recommend checking that this format is correct by previewing data inside Data Sync, just make sure there is one record already added to your SharePoint list (you might need to add this manually). To preview the internal SharePoint format you need to set the Connection Property TidyLookupData to False and then preview the data using the preview button either in the datasource toolbar or in the schema map toolbar.

Your value should looks something like 1;#User.
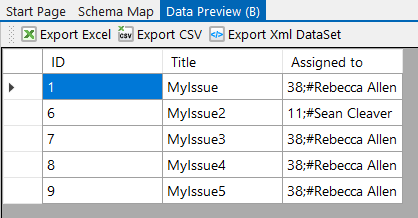
We will need to return the data to be added in this format after looking up the corresponding ID. To do this we will lookup the data we need inside the User Information List and then format it using a Calculated Column.
Lookup User
You might have your users listed in your source by their name or their email address. If you have the users listed with their full name (as it would appear in SharePoint with the TidyLookup set to True) then you can simply map this column to the field (e.g. assigned to) and Data Sync will do the rest for you. See the article on automatic lookups.
However for this example the users are listed by their email in the source dataset and this will not automatically match up.
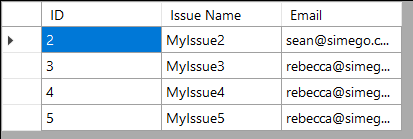
We need to lookup the users email addresses in the User Information List and then format this into the format SharePoint is expecting. The User Information List is usually in the Root site, in this example the list we are connected to is in a sub-site so we need to do a lookup into the root to get the data we need.
The easiest way to do this is by dragging the User Information List from your connection library (this will only be visible if the saved connection is to your root site) onto your source column and then configuring the lookup so that the Lookup Target Column is set to the email address.
Alternatively you can configure a lookup to the list manually by using the Add Lookup button in the datasource window or use a Calculated Column to define your lookup.
Lookup using the Lookup Button
Select the column with the data to lookup and click onto the Add Lookup button.
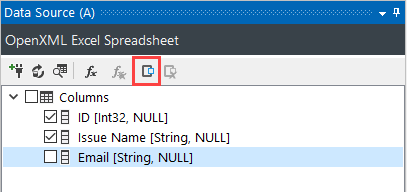
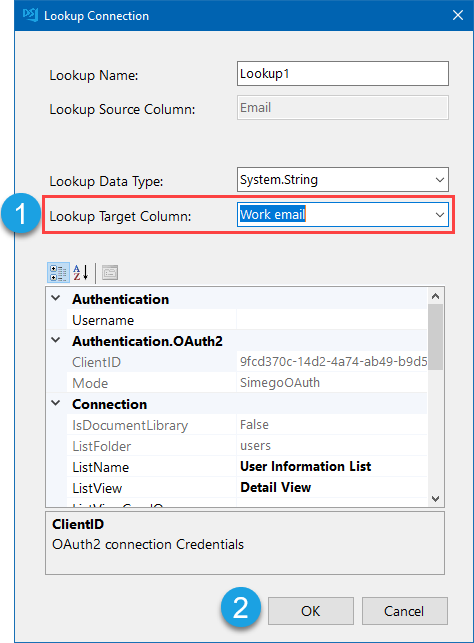
Then connect to your SharePoint site and set the Lookup Target Column to be the one that matches your source data. In this example we are matching on Work email but this could be a different value it will just depend on your datasets.
Lookup using Calculated Columns
To manually define the lookup to find each user from their email address we can use the LOOKUPB function with Calculated Columns.
The syntax for this function is:
LOOKUPB(column, FROM(KV("SharePointUrl", siteurl), KV("ListName", list)), WHEN(column, value))
You first define the column to return, then you can specify a specific sharepoint site if it is different to the one you are connected to in the target, then you specify the list to lookup in, and finally the parameters to match. This would be the source column you are using to get the values to lookup and the column from the lookup to match it to.
We cover how to look up data in another SharePoint site or sub-site in more depth in this section of the post.
To create a calculated column click onto the fx button in the source toolbar.

Now enter in a name for the new column, this needs to be unique and not already exist in your source, and make sure that the data type of the colum is correct for the data you will be returning. Then type in the function to lookup the data.
To lookup the Name of the user in the User Information list in the root sharepoint site, where the Work Email is equal to the Email in the users table the function we would use is:
LOOKUPB("Name",FROM(KV("SharePointUrl","https://company.sharepoint.com/"),KV("ListName","User Information List")),WHEN("Work email", Email))
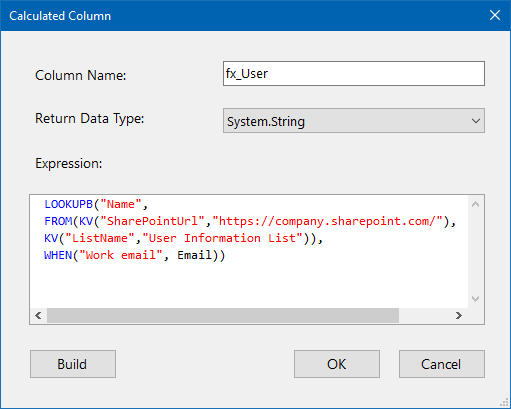
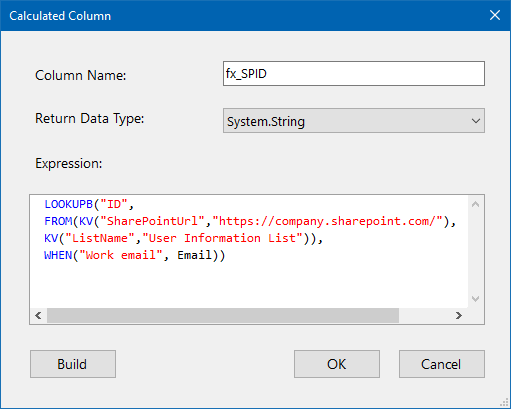
We also need to lookup the SharePoint ID for each user as well. To do this repeat the same process but change the function to look for the ID:
LOOKUPB("ID",FROM(KV("SharePointUrl","https://company.sharepoint.com/"),KV("ListName","User Information List")),WHEN("Work email", Email))
Format the Value
Now we need to use the lookup values to return the data in the SharePoint internal format. To do this create a calculated column by clicking onto the fx button in the source toolbar.
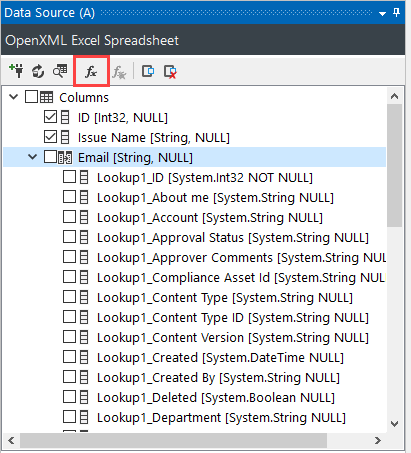
An example of the function you could use is:
FORMAT("{0};#{1}",Lookup1_ID,Lookup1_Name)
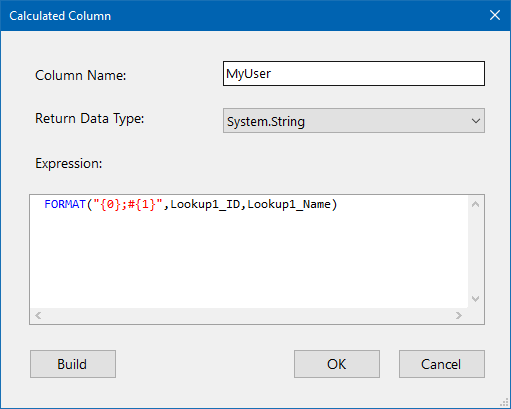
If you did the lookup using calculated columns then you would need to use the calculated column names within your function. Using the example from above the function would be:
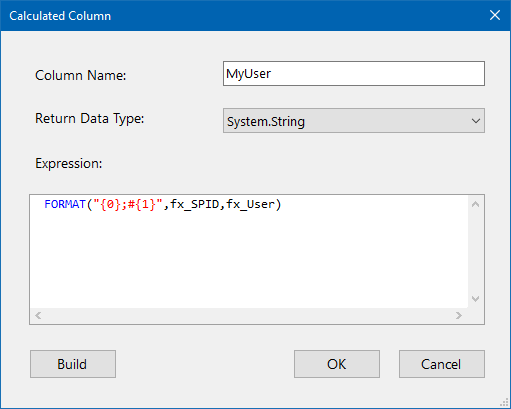
FORMAT("{0};#{1}",fx_SPID,fx_User)
However if your source contains null values you will need to handle those. An example of the function you could use for this is:
IF(ISNULL(Lookup1_ID),NULL(),FORMAT("{0};#{1}",Lookup1_ID,Lookup1_Name))
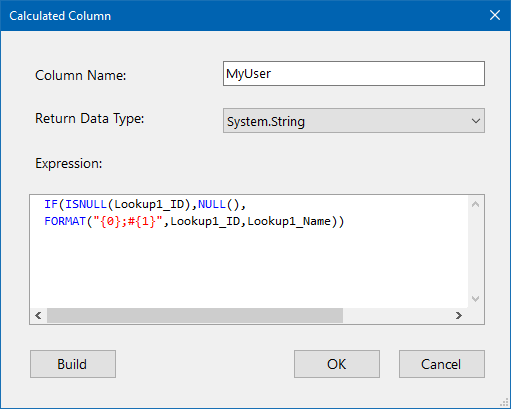
If you did the lookup using calculated columns then you would need to use the calculated column names within your function. Using the example from above the function would be:
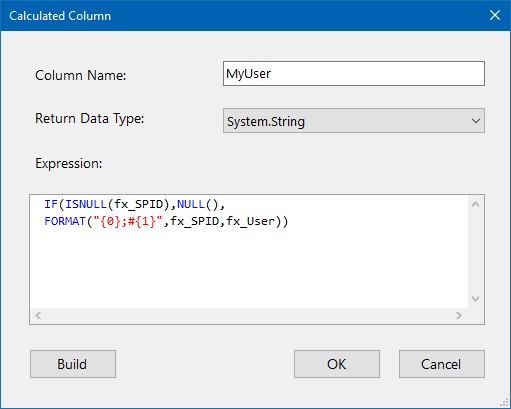
IF(ISNULL(fx_SPID),NULL(),FORMAT("{0};#{1}",fx_SPID,fx_User))
Configure the Schema Map
Now add your calculated column to the schema map and map it to the corresponding SharePoint column. In this example we map the calculated column Fx_User to Assigned to

Compare & Sync
Click the Compare A > B button in the toolbar to run the compare.
We can see that there are 4 records to add to SharePoint and clicking on to the green plus will enable us to preview the data that is being added to make sure it is correct.
If there are any updates then click onto the blue diamond to show the updates to be applied. Please note deletes are disabled by default but will still show in the list if there are any records in your list that are not listed in your source data.
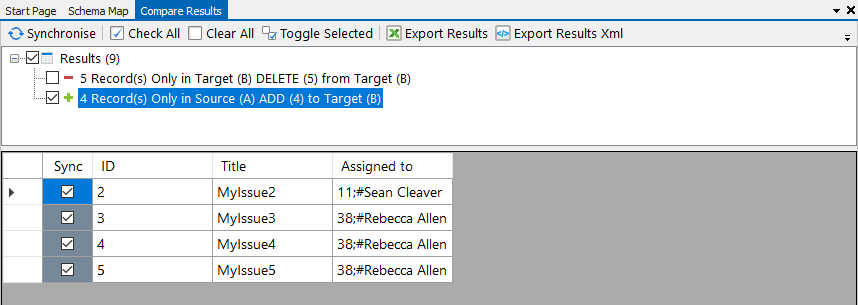
When you are ready to add the data to SharePoint click Synchronise and then Start to begin the sync.
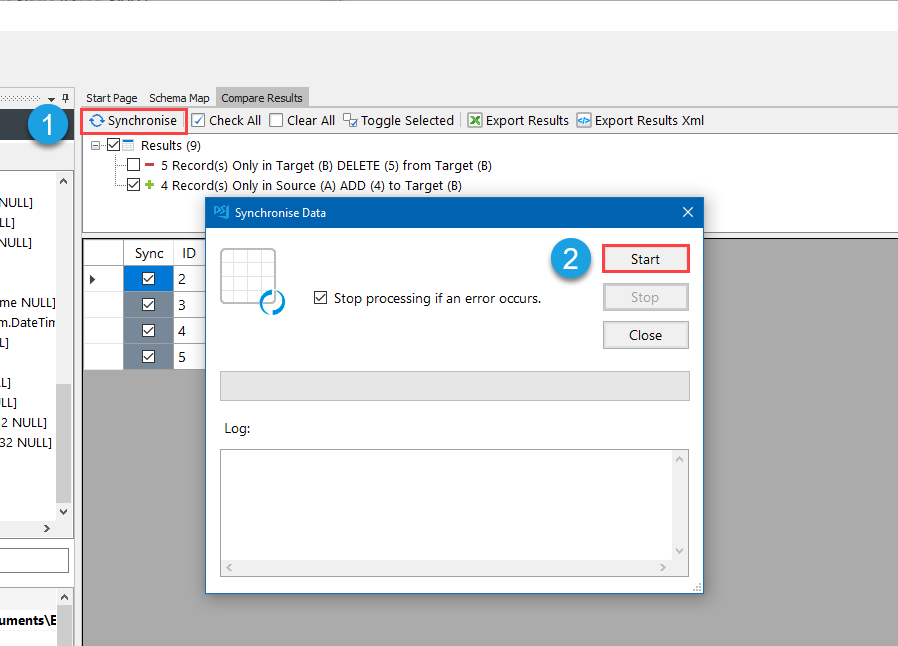
The records are now visible in the list and the lookup for the users was successful.
Adding Data to a Managed Metadata Column (TaxonomyList)
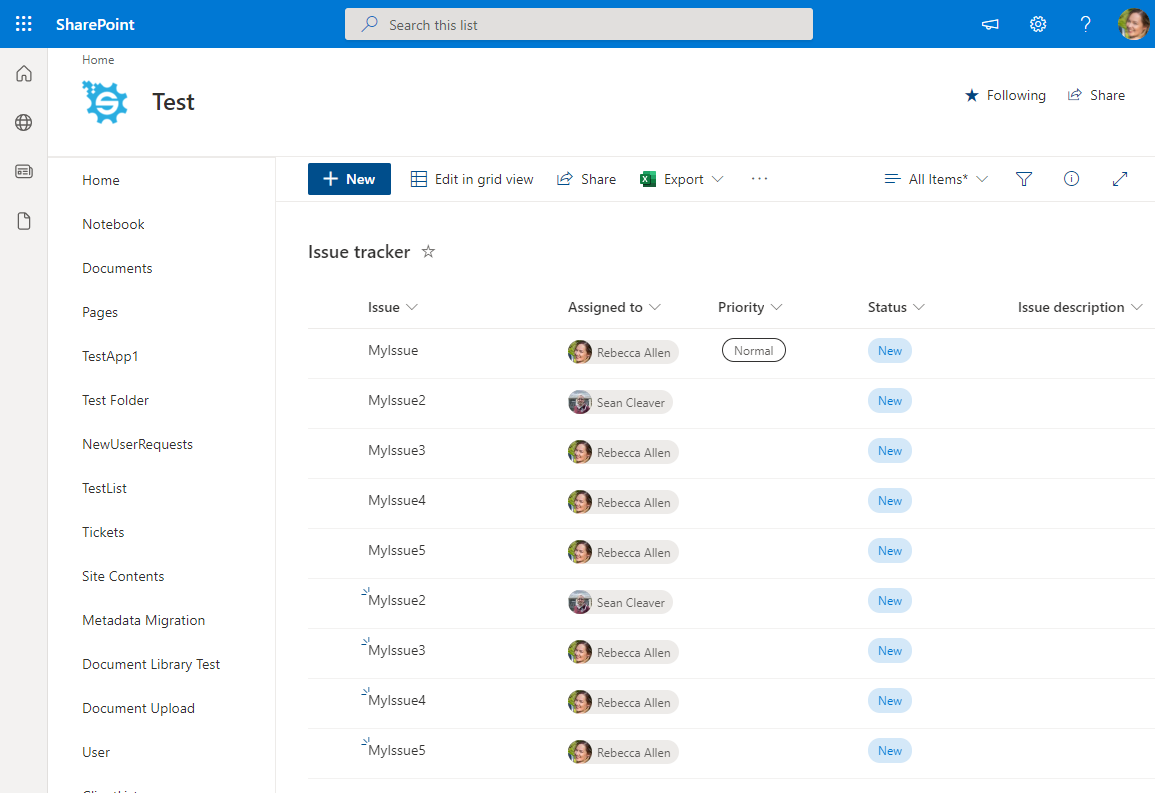
Managed Metadata columns are handled in a similar but slightly different way to other lookup columns in Sharepoint.
To write back to these columns they require the Guid (IdForTerm) and the name of the term formatted as Name|Guid.
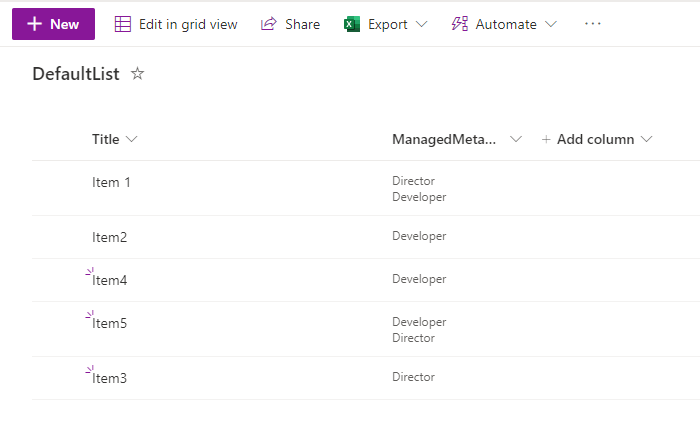
In this example we have a SharePoint list that has a Managed Metadata column which returns Job Titles. The roles are defined and listed in the TaxonomyHiddenList in SharePoint.
Start by connecting to your Source Data and to your SharePoint list as your target.
If you manually update a row in SharePoint you can preview the data to see what format is expected. This should match the Name|Guid format mentioned earlier. This data can be found in the SharePoint internal column which will have your column name followed by _0 and an internal name of a guid e.g. ManagedMetadata_0.

Lookup and Format the Data
We now need to lookup the Guid for each items. In this example our Managed Metadata is Taxonomy Data that returns the role e.g. Director, so we need to lookup the ID (guid) of the role in the Taxonomy Hidden List.
If you have only a single item in each row then you can use the following method. Otherwise if there are multiple items to be returned you will need to use Dynamic Columns which is described in the next section.
In this example we use a single function to lookup the ID and format the value so that we can write to the managed metadata column.
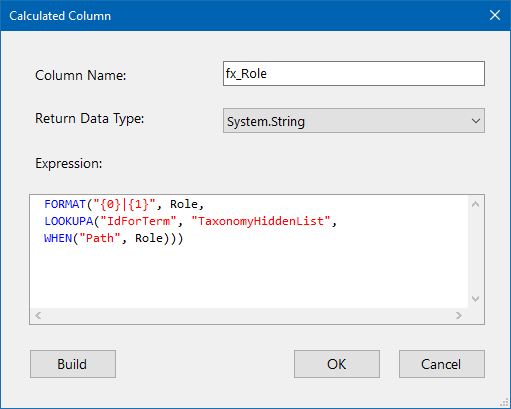
We make use of the FORMAT and LOOKUPB functions and it would look something like this:
FORMAT("{0}|{1}",Role,LOOKUPB("IdForTerm","TaxonomyHiddenList",WHEN("Path", TaxonomyTitle)))
The format function returns the name of the item followed by a | followed by the corresponding guid for the specific item.
The TaxonomyHiddenList is found in the Root SharePoint site so if you are in a sub-site you will need to configure the lookup to the Root site in your function to connect to the TaxonomyHiddenList. This would look something like:
FORMAT("{0}|{1}",Role,LOOKUPB("IdForTerm",FROM(KV("SharePointUrl","https://company.sharepoint.com/"), KV("ListName","TaxonomyHiddenList")),WHEN("Path", Role)))
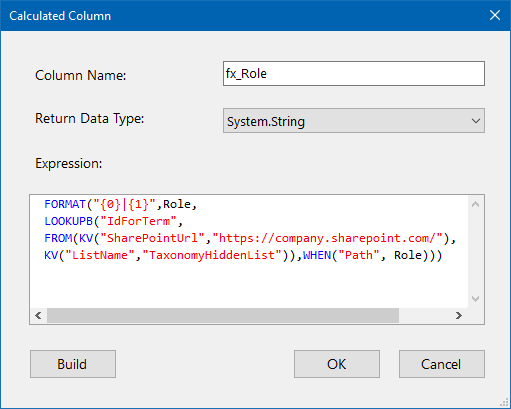
You can then add this column to the schema map.
Handle Multiple Items
If your data has multiple items listed in a row, then you can handle the lookup and formatting of each item using Dynamic Columns.
SharePoint separates these by semi-colons however if your source data is separated with a different separator you can define that within the code. For this example we have used a comma to separate each item in the source data.
The code you could use for this, changing the name of the items where applicable, can be found below:
partial class DataSourceRowOverride : Simego.DataSync.DynamicColumns.DataSourceRowInternal //Do Not Change This Line
{
    public string fx_Role { get; set; }

    public override bool BeginRow()
    {
        fx_Role = string.Empty;
        foreach(var term in Role.Split(','))
        {
            if(!string.IsNullOrEmpty(fx_Role))
                fx_Role += ";";

            fx_Role += FORMAT("{0}|{1}", term, LOOKUPB("IdForTerm", "TaxonomyHiddenList", WHEN("Path", term)));
        }
        return true; // return false to skip row from results.
    }
}
This creates a column titled fx_Role and splits each item at the comma into a term which can then be processed one by one. This is then rejoined into the correct format and separated by a semi-colon as SharePoint requires.
You can now map this to the schema map as described below.
Configure the Schema Map
Once you have created your lookup either using Calculated Columns or Dynamic Columns depending on your dataset, you need to map this to the internal SharePoint Column for your Managed Metadata.
In this example this is ManagedMetadata_0. Make sure to select a key column that is unique and can be used to identify each record.

Compare and Sync
Click the Compare A > B button in the toolbar to run the compare and preview the results.
We can see that there are 3 records to add to SharePoint and clicking on to the green plus will enable us to preview the data that is being added to make sure it is correct.
If there are any updates then click onto the blue diamond to show the updates to be applied. Please note deletes are disabled by default but will still show in the list if there are any records in your list that are not listed in your source data.

When you are ready to add the data to SharePoint click Synchronise and then Start to begin the sync.
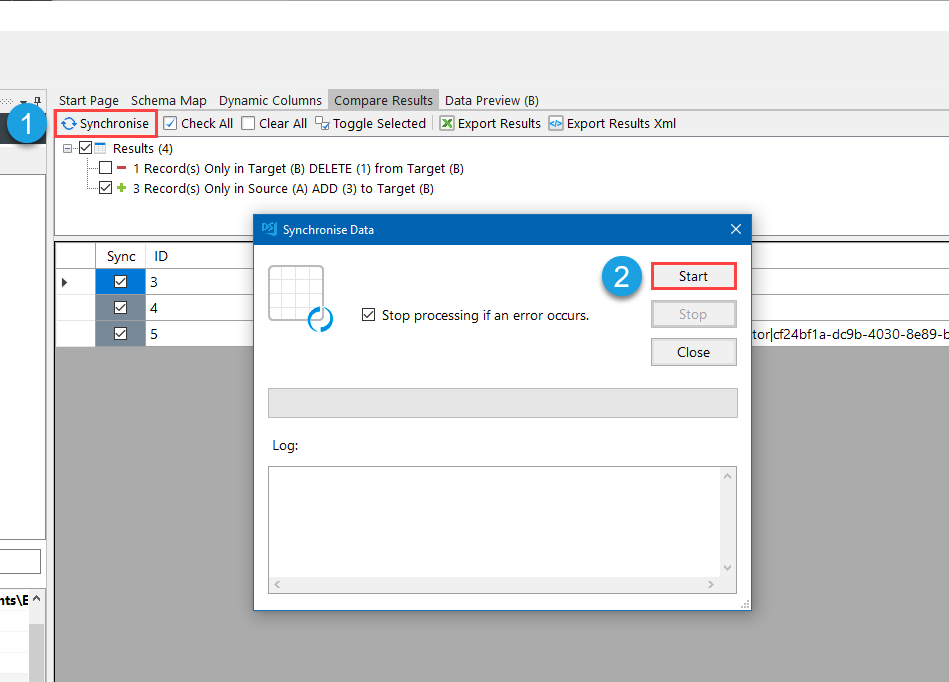
Your records will now be added to your SharePoint list.
Lookups from a SharePoint Subsite
Sometimes you might be connected to a sub-site of your main SHarePoint site but need to access data inside the Root (main) site. In some of the previous articles we've briefly talked about how you can do this with calculated columns but I will now cover this in a bit more depth and explain how the function works and how to lookup in another site using the lookup button.
You can also use the connection library if you have saved the connection previously. Just locate the list your data is found in and drag this onto your source column with the values to lookup.
Using the Lookup Button
Starting with an easy method, you can select the column in your source to lookup and click the lookup button to create a lookup.
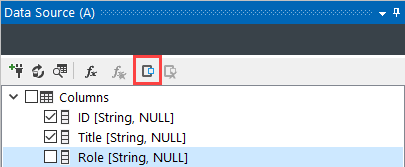
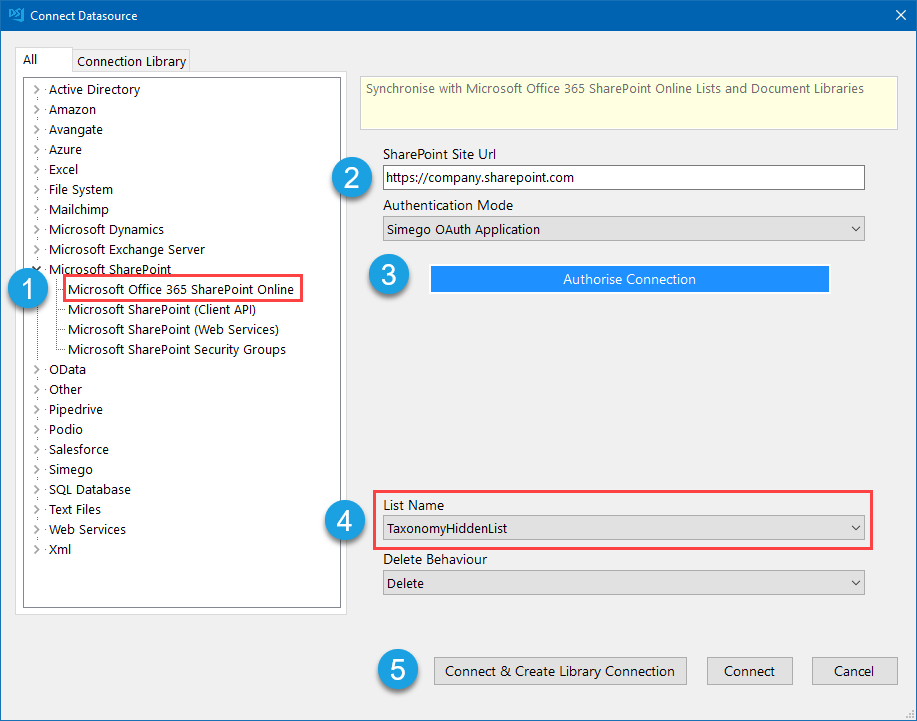
This opens the connection window where you can now connect to your SharePoint site. Just enter in the URL, authorise the connection and select the list from the dropdown. In this example we are connecting to TaxonomyHiddenList.
Clicking connect or connect & create library connection will then open the lookup configuration window.
Make sure to check that the Lookup Data Type and Lookup Target Column are correct. For this example the Path is the column that links to our source data Role which are string data types.
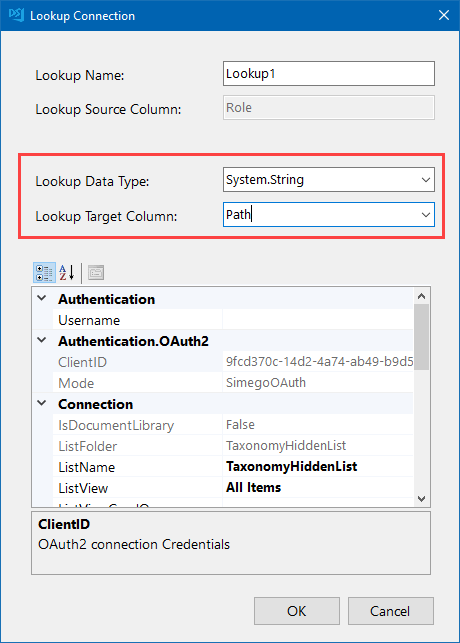
Clicking OK will then add the lookup columns to your source data.
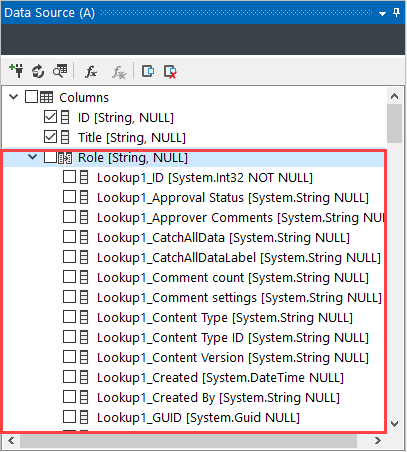
You can now use these columns in your schema map or within calculated column functions e.g. to format the values so that they can be written to SharePoint. This is discussed in more detail in the sections above.
Using Calculated Columns
You can also use calculated columns to define the lookup function and site to lookup in. Data Syncs lookup functions can handle extended formats that override the settings that are typically gathered from the data source properties.
For example if you are trying to write to a managed metadata column then you will need to lookup in the TaxonomyHiddenList to get the IdForTerm (Guid) for the item.
This list is maintained in the main root site and if you are not connected to that as either your source or target then you need to specify this within your lookup function.
The specific lookup function to use will depend whether you are connected to SharePoint as either your Source or your Target. If SharePoint is your Source then use LOOKUPA if SharePoint is your Target then use LOOKUPB.
The full syntax for these functions is as follows:
LOOKUPA(string column, FROM(KV(string parameter, string location/url), KV(string valueParameter, string valueName)), WHEN(string value, object))
And the inputs you can use are described in the table below:
| Object | Data Type | Description |
|---|---|---|
| column | String | The column name to find. |
| parameter | String | The parameter to override. |
| location/url | String | The location to find the parameter to override with, e.g. a URL. |
| valueParameter | String | The value you are looking for. |
| valueName | String | The name of the valueParameter you are looking for. |
| value | String | The value you are looking for. |
| object | String | The object you are looking to match the value to. |
Example
In this example we can get the User ID from the User Information List in the root site whilst running in the sub-site.
Add a calculated column to your source by clicking on the fx button in the data source window.

Then add the lookup function to lookup the value in the other site. An example of the function you might use is:
LOOKUPA("ID",FROM(KV("SharePointUrl","https://company.sharepoint.com/"),KV("ListName","User Information List")),WHEN("Name",Title))
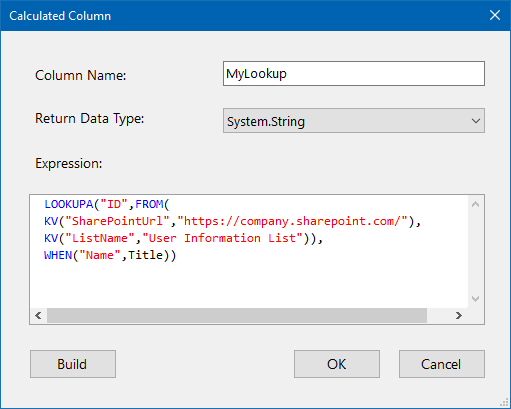
You can use this in combination with other functions, for example FORMAT to configure the value so that it presents exactly as expected. E.g. For Managed Metadata the value needs to be in for format TermName|IdForTerm so we can use an expression, shown below, to lookup the IdForTerm in the root site and return the data in the correct format.
FORMAT("{0}|{1}",Role,LOOKUPB("IdForTerm",FROM(KV("SharePointUrl","https://company.sharepoint.com/"), KV("ListName","TaxonomyHiddenList")),WHEN("Path", Role)))

Once you have created your calculated column, you can add the column to your schema map or use it in another function in your project.
If you have any questions about any of the topics covered in this article or you're not sure how to relate this to your project/scenario then please send us an email and we can guide you.

