Synchronising Data with Dynamics Navision and OData
With Data Sync you can import and export data to and from your Navision objects/cards.
The following article covers a couple of considerations you need when planning your Navision integration, we go through using Ouvvi to manage and schedule the whole project, and how to configure an example Data Sync step to get data from a SQL table into Dynamics Navision.
Although we use the example of a SQL table in this article, you can use any of the available connectors to import and export data from Dynamics Nav. If there is not currently a connector for your system then you can always build a custom connector.
Here we cover how to connect using OData V4 however check out our other blog if you are looking to connect via SOAP Web Services.

Contents
- Requirements
- Considerations when Importing into Navision
- Ouvvi Configuration
- Connect to your Source Data
- Connect to Navision
- Map the Source & Target Columns
- Preview the Results and Sync
- Schedule
- Exporting Data from Navision
- Connect to Navision
- Connect to your SQL Table
- Map the Source & Target Columns
- Preview the Results and Sync
- Miscellaneous
Requirements
Before getting started you need to ensure you have the following:
- Windows 10 or Windows Server
- Downloaded & Installed Data Synchronisation Studio
- Installed Ouvvi Automation Server
- Access to Dynamics Navision
- Access to a SQL table
If you do not have Data Synchronisation Studio you can get a free evaluation edition. To test Ouvvi during a trial please contact us to discuss upgrading your evaluation license.
Importing Data into Navision
You can quickly and easily synchronise your business data into Dynamics Nav when you use Data Synchronisation Studio.
You need to consider which columns you want to be updating within the cards and if those columns relational fields that lookup their values in a different entity.
For example, invoice needs the customer to already exist in the customer entity. If the value doesn't exist then an error will be thrown The remote server returned an error: (400) Bad Request.
So the customer entity needs to be updated before the invoice entity.
To get around this type of issue you need to look at the structure of your Navision and plan your integration accordingly. This is where Ouvvi becomes invaluable as you can contain each Data Sync project as a step, add descriptions to the overall project and individually on each step, and execute the whole process in a sequence. This ensures cards are updated in the correct order to prevent errors.
We came across a useful site for finding out the relationships between tables in Nav, if you want to take a look you can find it at this link: https://dynamicsdocs.com/nav/2018/w1/.
Below we cover creating your project and steps within Ouvvi and how to configure an example Data Sync step to connect to update data in Dynamics Navision.
Although we use a SQL table in this example you can use any of the other connectors as your source. This might be Active Directory, a SharePoint List, a CSV file or a Dynamics Entity to mention a few. Just select the connector you need, enter the required connection details and you're ready to go.
Ouvvi Configuration
We need to start by creating our Ouvvi project to hold each Data Sync step in the integration. To do this open Ouvvi and go to Projects > All Projects > New. Enter in a Name for your project and click Save to continue.

You then need to add a Data Sync step. For this integration project there are going to be multiple Data Sync steps that will need to be configured to connect to the source data and the relevant Navision entity.
For the purpose of this article we will only focus on the configuring of one step, but the process should be the same for each step.
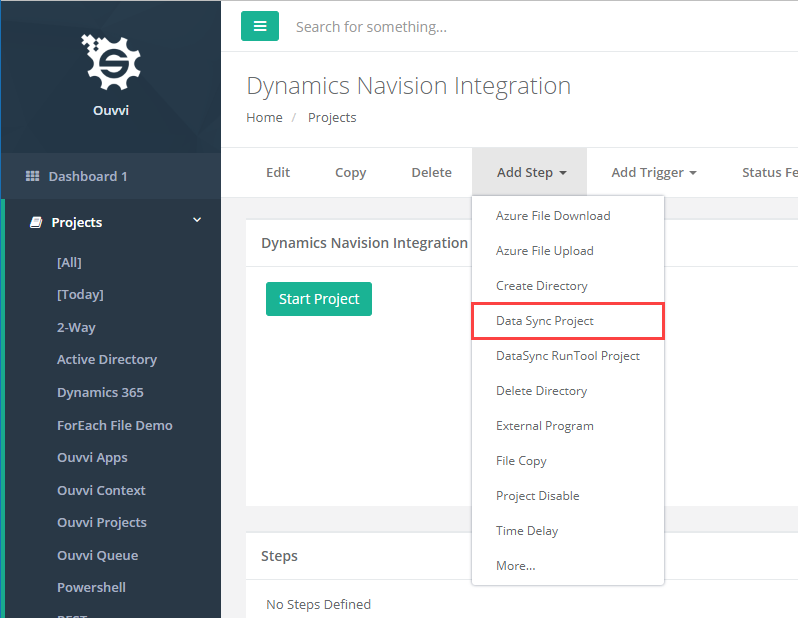
To add a Data Sync step go to Add Step > Data Sync Project and then enter in a name for the project and click Save.
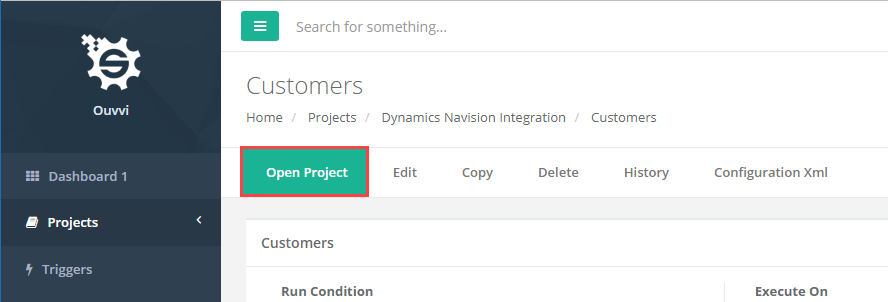
Then open the project by clicking Open Project.
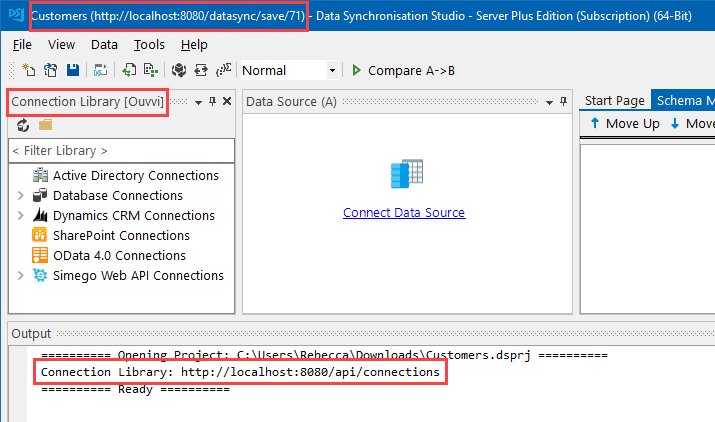
When Data Sync has downloaded from Ouvvi and you open the file, you should find that it shows as connected to Ouvvi.
You can check this in four locations:
1- The title bar
2- The connection library
3- The output window
4- The bottom right of the window
You can now configure the project within Data Sync.
Connect to your Source Data
In this example we will be configuring the project to import customers from a SQL table into the Navision Customers object.

To do this we need to start by connecting our Source window to our SQL table. To do this click onto Connect Datasource to open the connection window. Then navigate to SQL Database > Microsoft SQL Server (SQL Client).
Enter in the network name of your SQL Server, any credentials you might need to connect and set encryption or trusted certificate as required.
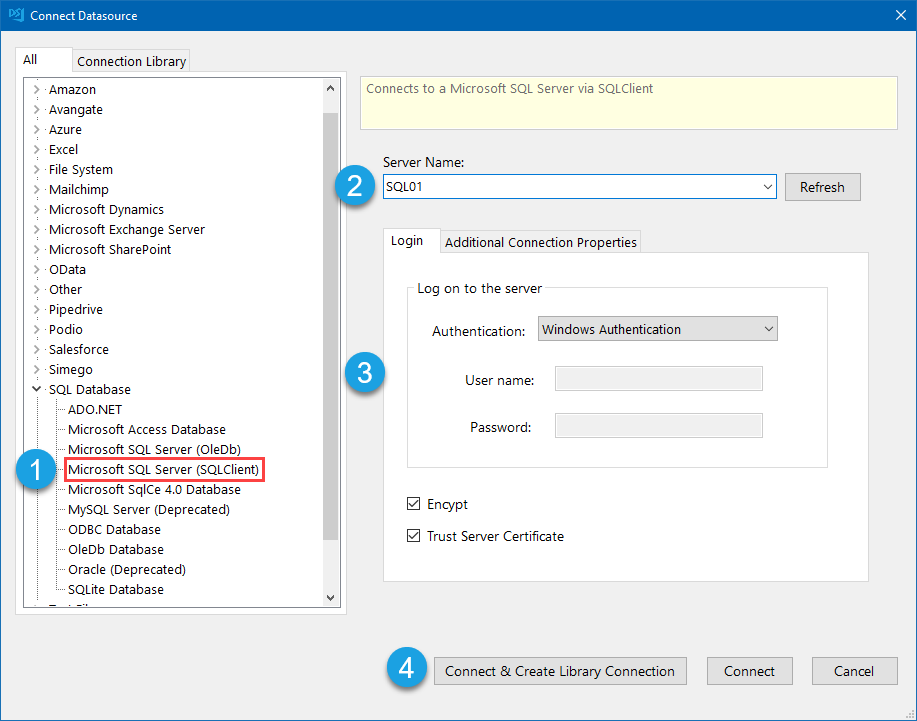
Click Connect & Create Library Connections to save this database connection to the connection library. This only needs to be done once per database and will make future project setup easier.
Select the database and table from the tree view to connect to, and if you are saving to the connection library another window will open where you need to enter a name in for the connection.
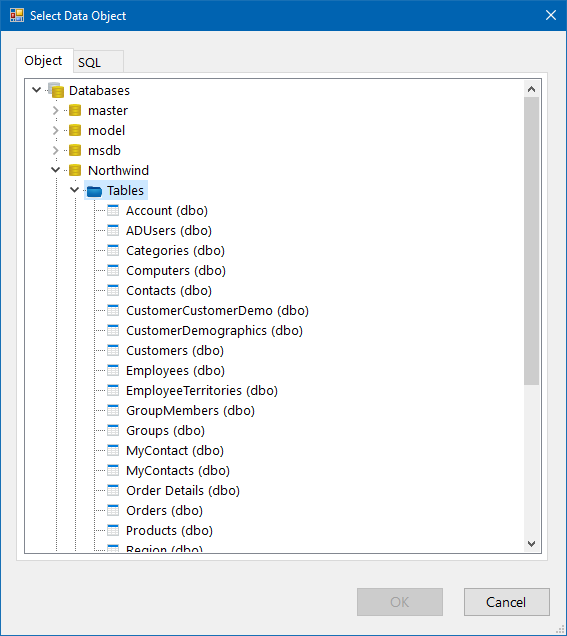
This will load the columns in your SQL table into the source window.
Connect to Navision
When connecting to Navision you need to have first published each entity you want to connect to.
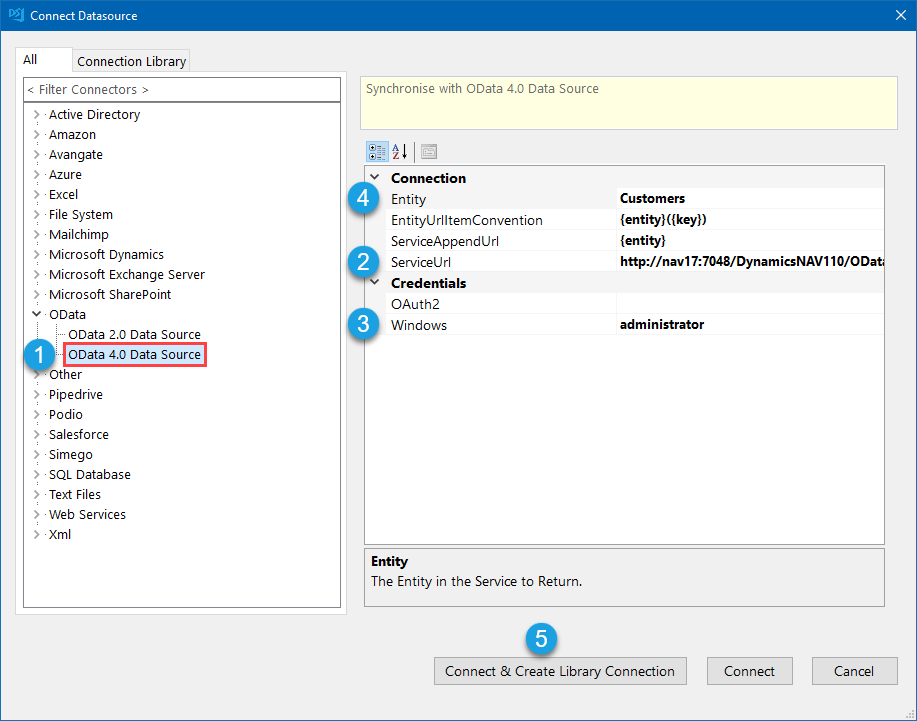
You will need the OData V4 endpoint URL which will look something like: http://nav17:7048/DynamicsNAV110/ODataV4/Company('CRONUS%20UK%20Ltd.')/Customers and you need to edit this to remove the entity from the end of the URL.
Your URL should now look like http://nav17:7048/DynamicsNAV110/ODataV4/Company('CRONUS%20UK%20Ltd.')/. Enter this into ServiceURL field.
Make sure to enter any credentials into the relevant credentials field. i.e. Windows credentials to access your Navision Server need to be entered into the Windows field. Leaving this blank will use the current user credentials. If the project is being run in Ouvvi, this will be the service account.
Be aware that if the account does not have permission to access the Nav server then the connection will fail and error.
Once these details have been entered select the entity/card to connect to from the dropdown. In this example we select Customers as we are exporting the Customer Card in Navision.
Click Connect & Create Library Connection to save the connection to the connection library. This only needs to be done once per site as you will be able to access the other entities/cards from the connection library.
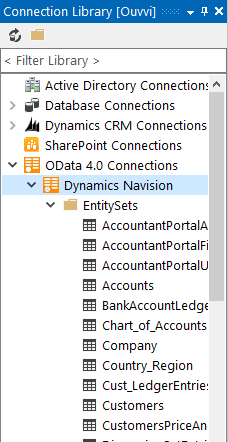
As the project has been opened from Ouvvi, the connection will be stored in the Ouvvi connection library.
If you have already saved your connection to the connection library then you can expand the connection and select the object you want to connect to.
NB. If you publish more Nav entities after you have connected you may need to delete the cache file and refresh your connection. You can find the cache folder by going to Tool> Open Schema Cache Folder, then delete the cache file for your Navision connection.
Map the Source & Target Columns
You now need to configure the schema map so that the source columns are mapped to their corresponding column in Navision.
Some nav objects will have multiple key columns so be sure to map these where required.
Make sure that the data types are correct and that you have selected a unique key column that can be used to identify each record.
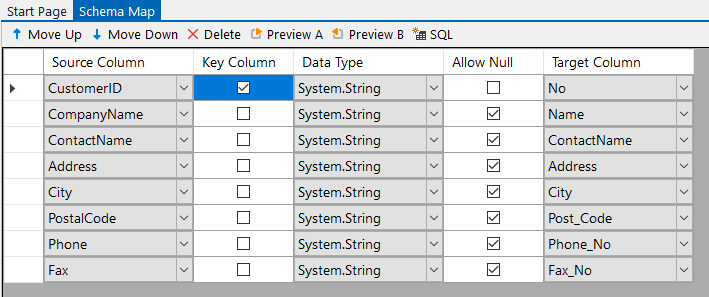
Navision can be tricky to integrate with so the initial project setup may have a bit of trial and error. You may find that some columns are not possible to write to or they may be expecting the data to be presented in a specific format. To diagnose try removing columns you suspect could be causing the error and add them back one at a time. You can also preview the records in Nav using the Preview B button to see how the data is being returned.
Preview the Results and Test
Once the mapping is complete you can click Compare A > B to preview the changes that need to be made. Here you can preview additions, updates and delete actions that need to be made. In this example there are 90 records to add and 1 to update.
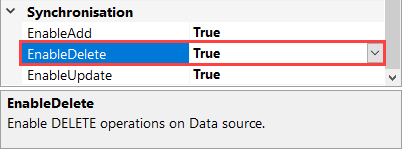
Please note that deletes are disabled by default but will still show in the results. To enable deletes please set EnableDelete to true in the target connection properties.
Click onto each option will enable you to view the changes. For updates the changes will be highlighted in yellow.

You can either wait to synchronise everything in sequence or you can run the synchronisation now. We do recommend running a test to make sure there are no issues as Navsion can be temperamental to write data to.
To test a few records start by deselecting the update checkbox and click onto the adds, then click Clear ALL to clear the checkboxes and select one or two records to add. Then click Synchronise and Start to begin the sync.
Be aware that if you are testing within the Cronus environment there are data restrictions. For example you can only add dates that are in Nov, Dec, Jan or Feb. Anything outside of this will cause an error to be thrown. In a fully licensed Nav environment you will not have this issue.
Once you are confident the columns are mapped correctly and Navision will allow you to write to the columns you have selected you can save the project and return to Ouvvi.
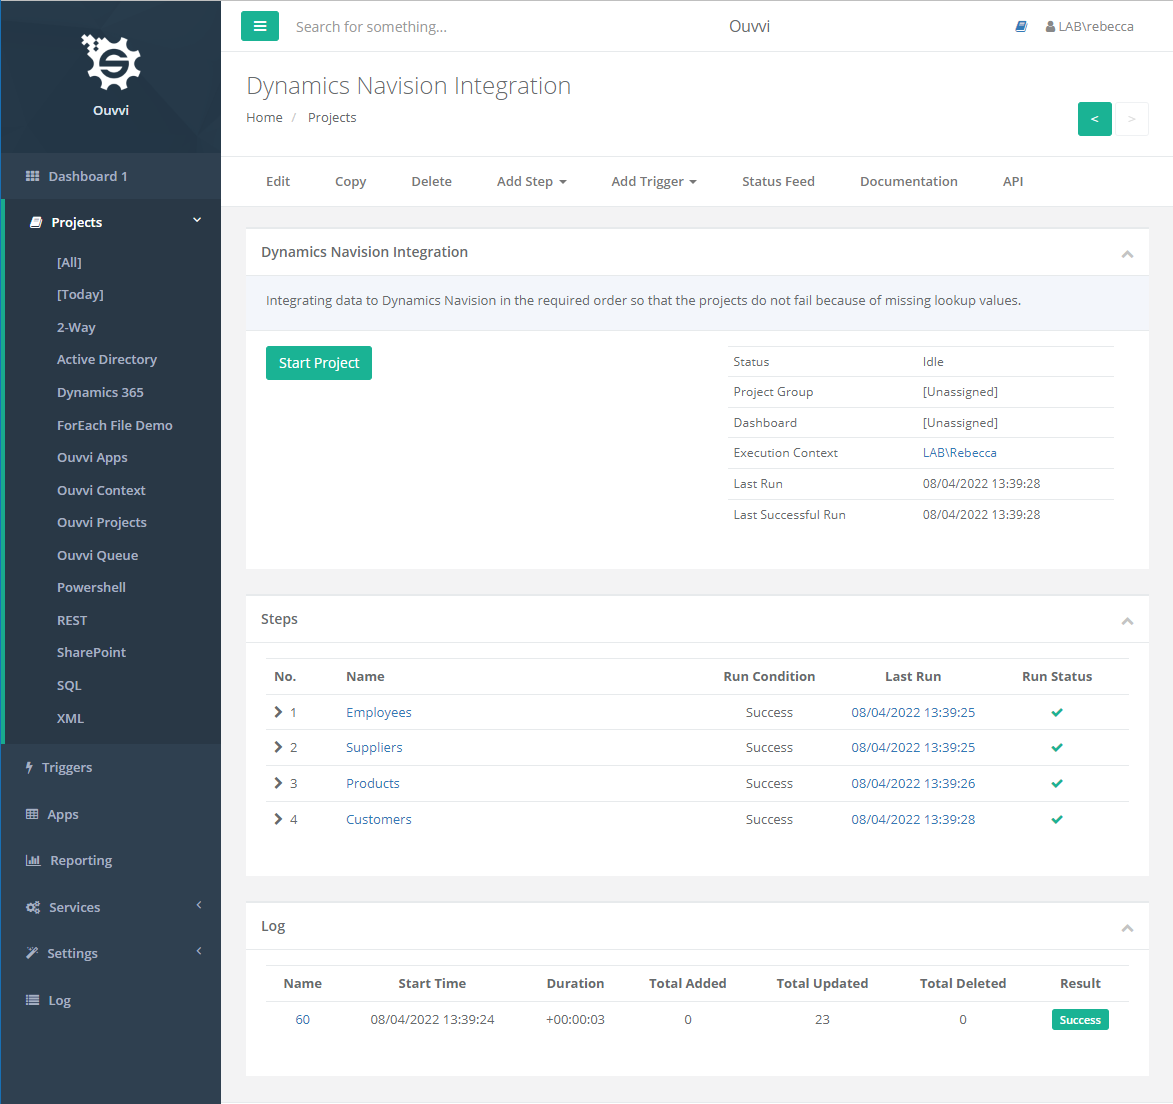
You can then continue configuring the other projects, add a trigger to schedule it or manually run the Ouvvi project with the Start Project button.
Your Ouvvi project might look similar to the below image once you have added all of your required steps.
Schedule
You can now add a trigger to your project to run it on a schedule, for this example we are using the start of day trigger and the end of day trigger. This will run the project at the times configured in the Ouvvi Settings.
By default these are 8am and 6pm but you can always change them to suit your needs. To do this go to Settings > System Settings > Edit and then change the start and end times.
Please be aware of any time zone settings and if your Navision or Server is using a different timezone eg. one might be in UTC and the other in local. This can make the trigger look like they are starting at the wrong time but are actually just running in the wrong time zone.
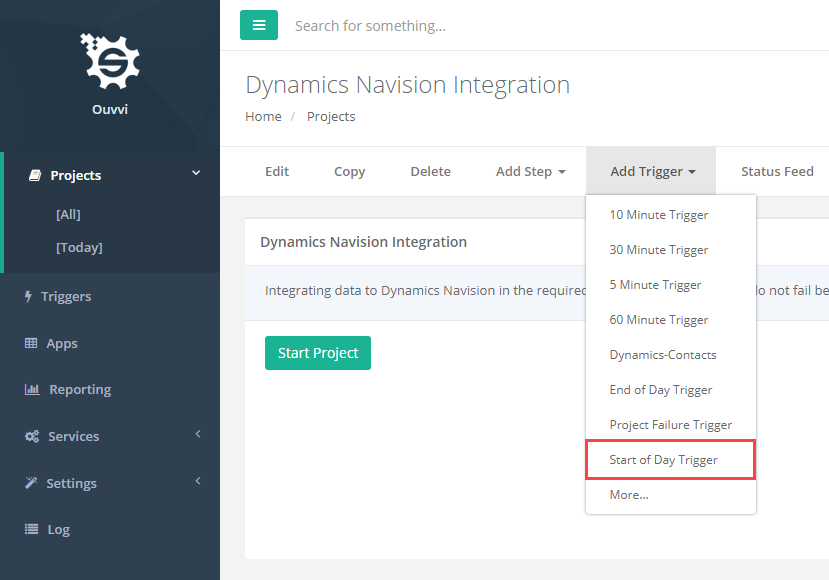
Please see our training page to learn how to create a new trigger.
Exporting Data from Dynamics Navision
If you need to get data out of Navision and integrate it with another business system then Data Sync makes this simple.
You can export the data previews to files such as XML, CSV, Excel and JSON for one off exports by using the buttons in the preview window.
Alternately you can create a new SQL table, CSV File or XML dataset for example from the tools menu, or you can connect to an existing system using any of the connectors available.
In the example below we are setting up a project that will export the Navision item card to an existing SQL table on a regular basis.
Connect to your Navision Object
To connect to Dynamics Navision in Data Sync you need to have first published the card in Navision so then you access the records via the OData V4 API.
In our documentation we cover how to publish entities in Navision..
You will need the OData V4 endpoint URL which will look something like: http://nav17:7048/DynamicsNAV110/ODataV4/Company('CRONUS%20UK%20Ltd.')/Lists and you need to edit this to remove the entity from the end of the URL.
Your URL should now look like http://nav17:7048/DynamicsNAV110/ODataV4/Company('CRONUS%20UK%20Ltd.')/. Enter this into the ServiceURL field.
Make sure to enter any credentials into the relevant credentials field. i.e. Windows credentials to access your Navision Server need to be entered into the Windows field. Leaving this blank will use the current user crednetials to access. If the project is being run in Ouvvi, this will be the service account. Be aware that if the account does not have permission to access the Nav server then the connection will fail and error.
Once these details have been entered select the entity/card to connect to from the dropdown. In this example we select Items as we are exporting the items from Navision.
Click Connect & Create Library Connection to save the connection to the connection library. This only needs to be done once per site as you will be able to access the other objects from the connection library.
If you have opened the project from Ouvvi then the connection will be stored in the Ouvvi connection library.
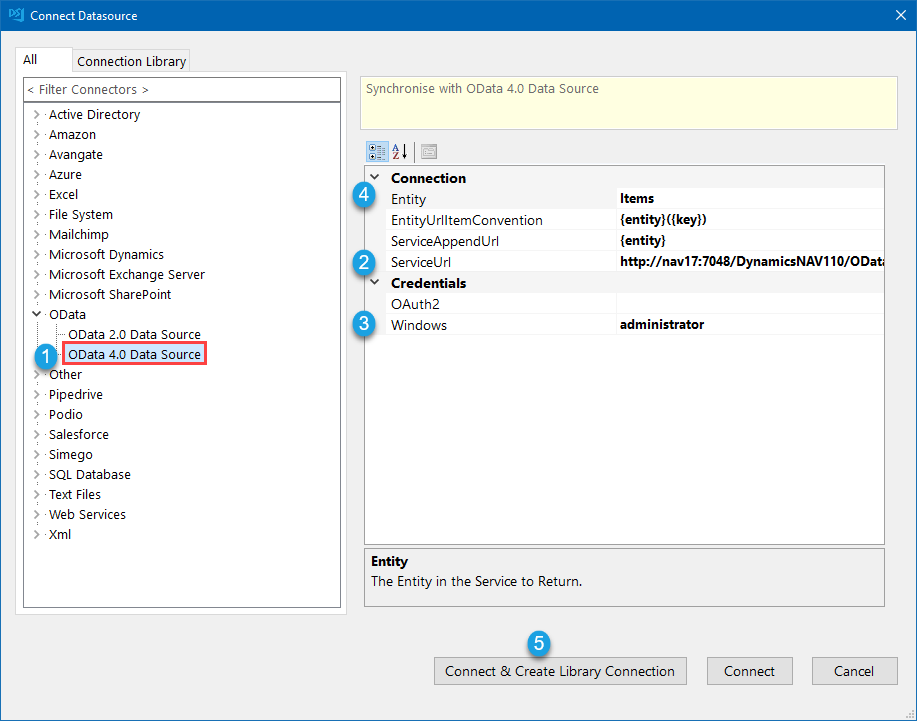
If you have already saved your connection to the connection library then you can expand the connection and select the entity you want to connect to.

Connect to your SQL table
To connect to a SQL table click onto Connect Datasource in the target window to open the connection window. Then navigate to SQL Database > Microsoft SQL Server (SQL Client).
Enter in the network name of your SQL Server, any credentials you might need to connect and set encryption or trusted certificate as required.

Click Connect & Create Library Connections to save this database connection to the connection library. This only needs to be done once per database and will make future project setup easier.
Select the database and table from the tree view to connect to, and if you are saving to the connection library another window will open where you need to enter a name in for the connection.

This will load the columns in your SQL table into the target window.
Map the Source & Target Columns
You now need to configure the schema map so that the columns in Navision are mapped to their corresponding column in your SQL table. Make sure that the data types are correct and that you have selected a unique key column that can be used to identify each record.

Compare the Results and Sync
Once the mapping is complete you can click Compare A > B to preview the changes that need to be made. Here you can preview additions, updates and delete actions that need to be made.
Please note that deletes are disabled by default but will still show in the results. To enable deletes please set EnableDelete to true in the target connection properties.
Click onto each option to view the changes that will be applied to your SQL Table. For updates the changes will be highlighted in yellow. In this example we have 226 records to add.

To synchronise the results click onto the Synchronise button in the toolbar and then Start to begin the sync. Your items will then be added to your SQL table and available to use.
Miscellaneous
Below you will find a few additional points on filtering the results, a few troubleshooting tips if your project is throwing an error, and how to clear the cache if you make changes to the connection.
Filtering the Results
You can filter the results before exporting by using the filter box built into the source window.Just enter in a C# Expression that returns true to only return a specific set of results. For example we could filter the items list to return only items of a specific type using the following expression:
Type == "Inventory"
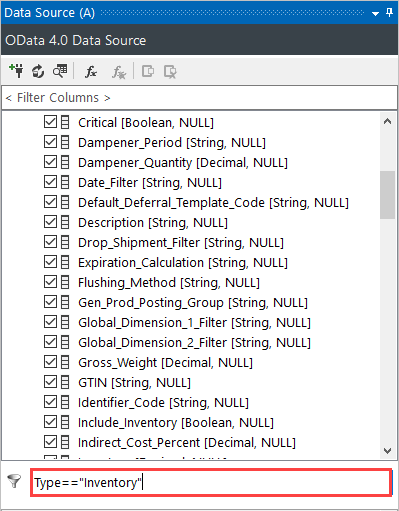
You can then preview the data using the preview A button in the schema map before synchronising to check the correct results are being returned.

Troubleshooting
Method Exception Failure
If you are getting a Method Exception Failure then it is most likely down to not publishing the correct object. For example for Items you need to publish and connect to the Items card.
Bad Request Error
If you keep getting Bad request as an error then you need to take a look at what is being written to as there are a couple of reasons for this error.
- There is a field that cannot be written to included in the schema map
- A field mapped in the schema map throws an action in Navision which cannot be handled on the API
- There is a required field missing from the schema map so the record cannot be created.
One way to diagnose which field is throwing the error is to remove fields and add them back one at a time, synchronising one record at a time.
Another way to work out what is wrong is to create a simple record in Nav and see what data is required in the UI. This will help you work out what is needed when writing to Navision.
You can also enable trace in the connection properties to see the data being sent in the output window.
Clearing the Cache in Data Sync
If you have published a new entity or made a change to the connection, you will need to clear the cache file before the new changes will be visible.
To remove the cache file go to Tools > Open Cache Folder and then delete the Navision file. Alternatively the cache folder can be found at C:\ProgramData\Simego\DataSyncStudio30\Cache.
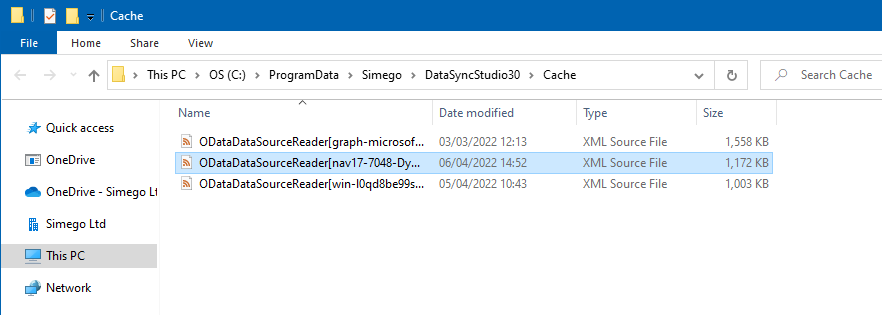
You can then go back to Data Sync and try connecting to Navision again. Your new entity should now be visible in the list.
If you have any questions please reach out to us at support@simego.com.
