Dynamic Columns - Back to Basics
Today we're going to look at DS3's (Data Synchronisation Studio 3) dynamic columns, however this time, it's from a beginners perspective. We will be looking at combining values, adding dates, and pulling information from other data sources.
So to start, we need to open DS3 and connect to a data source. I'm using the Microsoft Adventureworks Database and selecting the Contacts Table.
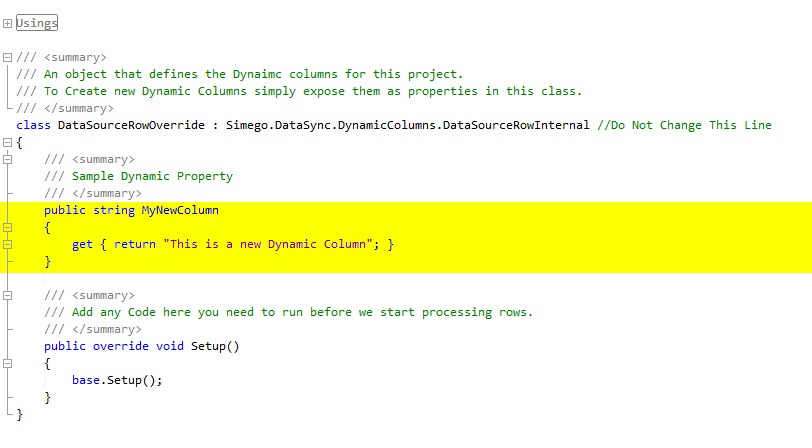
Once you have connected to your chosen data source, enable dynamic columns. You will see the following (or something like it). The part we're interested in, is the section highlighted in yellow. This is the part that creates the new dynamic column.
Deconstructing the Code
public string MyNewColum public means to make public/to make available for Data Sync to use.
public string MyNewColum
string basically means you can use numbers, letters and symbols
public string MyNewColum
MyNewColumn is the name of the dynamic column. This can be changed to anything baring in mind it cannot contain spaces or symbols, and must not start with a number.
MyNewColumn - My New Column - MyNewColumn1 - 1MyNewColumn
Adding Columns to Schema Map
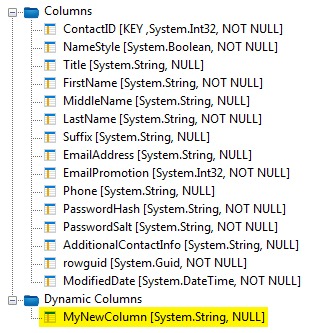
If you now press the 'build' button at the top of the dynamic column window, you should notice a new column in 'Data Source A' (left).
Switch to your schema map and add this new column by either dragging it over or by double clicking. Now press the 'Preview A' button to preview the data from 'Data Source A' including your new dynamic column. This will be the last column in the table and as you can see, the data in the column is the text that is returned from the function in the dynamic column window.
Combining Values
Combining values is very handy when needing to publish data on different systems. For example, building a new database for a new web application and pulling in existing customers from an older database. You may want to display a display name when a user is authenticated that will include their User ID, First Name and Last Name. In that table I'm using there is no such thing as User ID, so first I am going to create a User ID from the ContactID column.
Public string UserID
    {
        get
        {
            return string.Format("SU{0}", this.ContactID.ToString("D4"));
        }
    }
The above code will return something like this SU1234
Remember... If you have added a new property (column), to press the 'Build' button to compile the code so that you can add it to the schema map before you click the 'Preview' button. If you change the name of the column, also remember to add it back to the schema map.
We're using string.Format() so that we can add a prefix to the ContactID. The '{0}' gets replaced by this.ContactID.ToString("D4")
We could just use this.ContactID, however for a ContactID of 1, this would return SU1 which doesn't look like much of a User ID, so instead we prepend zeros to the ContactID by using ToString("D4").
Now the User ID looks like this SU0001.
Now we have our User ID, we can start to build our display name. We're again going to use string.Format() to do this.
public string DisplayName
    {
        get
        {
            return string.Format("({0}) {1} {2}", this.UserID, this.FirstName, this.LastName);
        }
    }
The above code will return something like this (SU1234) Joe Bloggs
This format function contains '{0}', '{1}' and '{2}'. UserID will replace '{0}', FirstName will replace '{1}' and LastName will replace '{2}' As you may of noticed I have changed the Column name to 'DisplayName', so once built you will need to add this back to your schema map.
Inserting Time & Date
In this example we will be adding the 'Synchronised Date' as this is one of the most simple things that you can do with DateTime.
public DateTime SyncDate
    {
        get
        {
            return DateTime.Now;
        }
    }
This will actually return the time and date when the data is loaded rather than when it gets synchronised, however it gives a reasonable value.
We could get slightly more complex and get a duration from two(2) dates.
public TimeSpan Duration
    {
        get
        {
            DateTime dt1 = DateTime.Now;
            DateTime dt2 = dt1.AddMinutes(8).AddSeconds(45);
            return dt2.Subtract(dt1);
        }
    }
So in this code example we are adding eight(8) minutes and forty five(45) seconds to dt1. This is just to create a new date so that we can get a duration from the two of them. In a real situation you would have another date to compare against. For example, online exam started and online exam finished would give you the duration that the examination took to complete.
Pulling Data form other Data Sources
Importing data during a sync can be extremely useful if you want to merge two(2) data sources. In this example we will link 'Contact' with 'ContactCreditCard' not that you would ever want to do this, but for the purpose of this example this is what we'll be doing :) First off... Add the using Simego.DataSync.Helpers at the top of the code window (Click the plus icon to expand them)
// Create Lookup Helper Dictionary
    private OleDbDataLookupHelper<int, string> Lookup;

    // Create new Dynamic Column for Credit Card ID
    public string CreditCard
    {
        get
        {
            // Check to see if the Helper Dictionary contains a creadit card id for the current contact
            if (Lookup.Items.ContainsKey(this.ContactID))
            {
                // If contact has a credit card on file, return the credit card id
                return Lookup.Items[this.ContactID];
            }
            // Otherwise leave as blank
            return null;
        }
    }

    // This code happens before the data is loaded
    public override void Setup()
    {
        // Add items to the Lookup Helper Dictionary
        Lookup = new OleDbDataLookupHelper<int, string>(
            // This uses Data Source A's connection to the database.
            // This is fine if you are connecting to a table in the same database,
            // otherwise you would have to enter a connection string like this...
            // data source=MYSERVER;initial catalog=MYDATABASE;integrated security=false;persist security info=true;User ID=MYUSERNAME;Password=MYPASSWORD;
            this.DataSourceA.Settings["ConnectionString"],
            // This is the select statement. This selects all records from table Sales.ContactCreditCard
            "SELECT * FROM Sales.ContactCreditCard",
            // This is the column we want to use for the dictionary key
            "ContactID",
            // This is the column we want to use as the value
            "CreditCardID"
            );
    }
The above code creates a blank dictionary which we then populate during the setup by connecting to another table in the same database. We then create a new dynamic column which checks the dictionary for a value. If the dictionary contains an item for that contact, it then uses this a its value for the current row.
I hope this has helped you understand a bit more how dynamic columns work. If you need any more help just ask in the comments.